Pages

Tuesday, November 20, 2012

Mango Sago Pudding

The best thing about living in a four seasons country is the food harvest from each season. This is our first spring/summer in Melbourne and currently mangoes are in season. At the vege market near our place, a tray of Kensington mangoes is selling at $15 for about 12 pieces (mid size ones) which is pretty reasonable. However, hubby is not too fond of Aussie's mangoes so we did not buy a tray but a few fruits each time I shop. He will buy the Thai's King mango instead. :P

I got this free magazine from one of the local supermarket and spotted the recipe for mango sago pudding and thought I should give it a go since I have some ripe Kensington and some coconut milk balanced from my laksa a few days ago.

The recipe called for the syrup from the canned mango so I decided to modify the ingredients' portion as I know it will be very sweet if I follow the recipe to the dot. After mixing the mango puree, the color was not too 'bright' yellow so I decided to 'pump' it up by adding a small squirt of yellow food coloring which turned out gorgeously. :)

.

.

Ingredients

  • 1 can Mango in syrup (I used the 425g can) - pureed

  • 100 gm Sago

  • 200 ml Water

  • 50 gm Caster sugar

  • 130 Coconut cream/milk

  • 1 fresh Mango (half for puree and half for garnish)

  • Yellow food coloring (optional)
.

Methods

  1. Drain mango slices and reserve the syrup. Puree the mango slices and set aside.

  2. Rinse sago in running water and drain.

  3. Combine the mango syrup, sago, water and sugar in a medium saucepan and bring to boil over medium heat stirring frequently.

  4. Reduce the heat and simmer + stirring until all the sago turned translucent and the mixture is thick and sticky. This will take at least 20 minutes or so.

  5. Add in the coconut milk, stir and simmer for another 5-6 minutes and remove from heat.

  6. Mix in the pureed mango and stir till well combined. Add yellow coloring if you're not happy with the natural color (looks a bit greyish)

  7. Spoon into ramekins, covered and chilled. Serve with cubed fresh mango.

Thursday, November 1, 2012

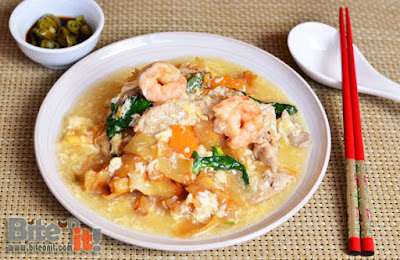
Wat Tan Hor - Fried Flat Noodles with Egg Gravy using HCP

After staying in Melbourne for more than half a year, we are starting to crave for some Malaysian food which we used to have almost every other week. Though there are some Malaysian and Singaporean restaurants here but for a simple plate of noodles it can cost a crazy AUD$16 just because they add in 2 mid sized tiger prawns! Ridiculous!

For that, I have started to learn how to cook a few dishes which are our favourites. To be honest, it was not that tough as it looks just that it needs a little more time for the preparation. One of these dishes is the Wat Tan Hor which is fried flat rice noodles covered with egg gravy. This is our all time favorite. The kids just love it and each time they will clean their bowls whenever we have this dish.

The important ingredient for this dish is the lard... pork or chicken depending on how health conscious you are! :D I normally use chicken lard since I get a lot from the chicken thigh meat I buy.

With the HCP, I can cook this dish in a jiffy! :)

.

.

Ingredients

  • 750 gm Flat rice noodles (kway teow)

  • 300 gm Chicken thigh meat (cubed) or pork (sliced) - marinaded

  • 10 pcs Prawns (shelled)

  • 3 stalks Choy Sum

  • Carrot slices

  • 1 tbsp Garlic (minced)

  • 2 tbsp Lard

  • 2 Eggs

  • 3 tbsp Corn flour (mixed with some water)

  • 1 box (500ml) Chicken stock + 1 cup water

  • Some oil, light soy sauce and black soy sauce for dry frying flat noodles

.

.

Marinade for chicken

  • 1 tbsp Cooking wine

  • 1 tbsp Light soy sauce

  • 1 tsp Fish sauce

  • A dash of pepper

  • A dash of ginger powder

  • A dash of garlic powder

  • A dash of salt
.

Methods

  1. Heat up your HCP/flat frying pan with some oil. Toss in some flat noodles (best to do it in 2 batches), add some light soy sauce and black sauce (depending on how dark you want your noodles to be) and simply dry fry them until they are soft. Lift up when they start to stick into a lump and continue with the balance noodles.

  2. Once done with the noodles (without washing the pan), heat up some oil and the lard and sautee the minced garlic till fragrant, add in the chicken cubes/pork slices (I usually put a combination of both) and stir fry till 60% cooked, add in the prawns and cook for another minute.

  3. Add in the chicken stock and water and simmer till boil.

  4. Add in the carrot slices and continue to simmer on medium fire for 2-3 minutes, add in the choy sum (cut to 2" length) and continue to simmer for another minute.

  5. Add in corn flour solution and stir to make sure the corn flour did not harden into balls.

  6. Switch off the fire and quickly stir in beaten eggs and stir continuously to create 'flower' effects.

  7. Portion the flat noodles into plates/bowls before pouring the gravy over.

  8. Serve with some pickled green chillies.

Monday, September 24, 2012

Fruits & Nuts Cinnamon Rolls

Now that my bun making engine is in the momentum, I decided to try as many bakes as possible before I drop down! There are just too many buns and breads I wanted to make but time is always a factor since it requires a lot of time since there are so many steps involved. The proofing of doughs have been the toughest as I have to manage my time so that my baby is napping when the dough is ready to be shaped.

Anyhow, I decided to bake some cinnamon rolls in between if I can find the time as it is simpler compared to making those assorted buns. However, cinnamon rolls are more sinful since there are more butter and sugar used but I can tell you, the aroma while it is baking in the oven will make it all worth while... not to mention when you bite on it! And they are great when accompany with some nice fruit tea! :)

.

.
I've tried 2 recipes for the cinnamon rolls and found out that the Pai Bao or Hong Kong Sweet Bun recipe is more fragrant compared to the one with less ingredients though still using Tang Zhong. The texture is more or less the same so if you are out of some of the ingredients for Pai Bao, you want actually use this recipe. :)

.

.
I love how soft and fluffy these rolls are!

The weather here is cold so it get harden faster as compared to when you are in the tropics. Therefore, each time I want to eat one of the rolls I will heat up for about 15-20 seconds in the microwave and it comes out light and fluffy again!

.

.

This recipe is adapted from here but instead using a bread maker, I used my mixer for the kneading.

.

Ingredients (yields 9 rolls in a 7"x7" baking pan)

  • 210 gm Bread flour

  • 50 gm Cake flour

  • 5 gm Yeast

  • 50 gm Sugar

  • ½ tsp Salt

  • 1 Egg + water = 110 gm

  • 75 gm Tang Zhong

  • 30 gm Butter (cut into small cubes)


Filling

  • 30 gm Butter, cut into small chunks and soften

  • 30 gm Brown sugar + 1 tbsp ground cinnamon powder

  • 100 gm Mixed dried fruits or raisins + Nuts (I used raisins, dried apricots and walnuts)

Some beaten egg and melted butter for glazing.

.

Method:

  1. Put all the wet ingredients except butter into the mixer, stir them a bit then add in the flour, sugar and yeast. Then fit the mixer with the hook attachment and put on speed 2 to start kneading. When everything comes together, put in the salt and continue kneading for a minute or two before putting in the butter.

  2. Once the kneading is finished, approximately 30 minutes, remove and place dough on a floured surface.

  3. Punch down and shape it round. Rest dough for 15 minutes covered with a cling wrap or cloth (I proofed in the oven for 30 mins as it was a cold day here).

  4. Roll dough into a flat sheet of 28cm x 40cm with a rolling pin.

  5. Spread the cinnamon sugar evenly and top it with butter cubes and the dried fruits and nuts.

  6. Roll it up swiss-roll style and cut into 9 pieces of about 3cm thick.

  7. Put them in a 7"x7" (20cm x 20cm) baking pan and proof for 45 minutes or till double in size in a warm place, covered with a damp towel.

  8. Glaze with egg wash and bake at 180C for 20 minutes.

  9. Remove from oven and quickly glaze with melted butter for added fragrance and presentation.

Monday, September 17, 2012

Basic Dough for Assorted 65ºC Buns

I was a huge fan of Bread Talk when they first started selling those soft buns back in 2001 in Singapore. Their meat floss buns were my favorite and now my kids'. However, meat floss is not cheap here so I went with the flow of using other ingredients for my buns instead. Therefore, each time I am up for bread making, I will do assortment so everyone can have their favorite :)

So far, there is only 1 recipe (Pai Bao or Hong Kong Sweet Bun) which can yield great tasting buns with very nice texture using Tang Zhong. This Pai Bao recipe was shared by Christine using a bread maker. However, the dough is pretty sticky as it has quite a high amount of liquid hence I have problem handling it since I do not have a bread maker. I used my Kitchen Aid to help with the kneading. I tried not to use too much additional flour else the texture will be altered.


Therefore, I decided to tweak the recipe and cut away some of the liquid used but managed to maintain the same texture.

.
Ingredients
370 gm bread flour
65 gm caster sugar
5 g salt
12 gm full cream milk powder (optional)
6 gm instant dry yeast
1 egg yolk
30 gm whisked egg
100 ml milk (it is about 100 gm)
120-130 gm Tang Zhong
50 gm condensed milk
35 gm unsalted butter, softened

.

Methods

  1. Add all the wet ingredients (milk, egg, tangzhong, condensed milk), then followed by the dry ingredients (yeast, sugar, milk powder, bread flour) into the mixer bowl. Mix everything with a rubber spatula until well combined then add in the salt.

  2. Attached the hook attachment onto your mixer and let it knead on Speed 2 or 3 till everything come together. Add butter and continue kneading until the dough is smooth and elastic. I knead about 30-40 minutes with a few stops in between to scrape the side down. Also, this will allow your mixer's motor to rest else it will get too hot.

  3. Take a chunk of the dough and do the 'window pane test'. When you stretch the dough, you should be able to see a thin layer of membrane. You may want to knead with your hand if your mixer is taking too long to reach this stage. (Rub some oil onto your hand before handling the dough else it will stuck on your hands!)

  4. Once your dough is ready, shape it into a big ball and let it go for the 1st round of proofing which is about 40-60 minutes. Grease your bowl with some oil for easy release later. The best temperature for proofing is 28C, humidity 75%, until double in size. If you're living in cold climate like I am, you may want to heat up your oven and proof your dough in there covered with a damn cloth.

  5. Once the dough has proofed, transfer the dough to a clean floured surface. Deflate using your fist (punch the dough flat) and divide into 4 or 6 equal portions. Cover with cling wrap, let rest for 15 minutes at room temperature.

  6. To make kid size buns, you divide the dough to about 40gm to 45gm each  and roll out each portion of the dough with a rolling pin and wrap (eg: red beans paste) or shape your buns as you wished. Proof your shaped buns on baking tray lined with parchment paper, covered with cling wrap or damp cloth for 2nd proofing. The best temperature for 2nd round of proofing is 38C, humidity 85%. You can heat up your oven again for this step.

  7. When the dough has doubled, lightly brush the surface with egg wash (whisked egg). Bake in a pre-heated 180C (356F) oven for 20-25 minutes or until surface turns brown. Remove from the oven and transfer onto wire rack. Cool completely before storing.

Thursday, September 13, 2012

Tang Zhong (Water Roux) for Bun Making

Looks like the current trend now is to make bread and buns! Well, I don't want to be left out too! :lol: Like many others, I have joined the bread making bandwagon a few weeks back and it has been addictive! Have been trying various recipes and figured that those bread using the Tang Zhong or Water Roux Method has better texture... softer and fluffier!

So, what is Tang Zhong? It is something like a dough starter but this one you don't have to ferment anything for hours or days. Basically you can use it almost instantly. Tang Zhong is also the basic for making the 65°C bread and buns. All you need is some bread flour and water, mix together under small flame.

.

.

Ingredients (to make approx. 130gm of TZ)

  • 25g Bread flour

  • 125ml Water


Methods

  1. Mix bread flour with water in a small sauce pan, stir with a whisk under small flame.

  2. The mixture will start to thicken so you'll have to stir consistently else it will burn.

  3. Once it reaches 65ºC, you will see the mixture turning creamy looking and when you see lines/streams appearing while you stirred, means you have reached the right consistency (refer to photo above)

  4. Remove pan from the heat and pour the Tang Zhong into a clean bowl and cover with a cling wrap touching the surface of the mixture. You can keep it in the fridge up to 3 days. Discard when it turns greyish.

  5. You can use it once it has reaches room temperature.

Friday, August 17, 2012

Strawberries & Cream Swissroll

Besides chiffon and sponge cake, I am also a fan of Swissrolls. Well, probably it is also another type of sponge cake! :P I just like cakes that are not too heavy but spongy and light. I don't really fancy buttercream but happy with some fresh cream. Used to buy a lot of Swissrolls each time we visit Ipoh. I guessed everyone who has visited Ipoh, knew about or tasted JJ Swissrolls. I was a HUGE fan! hehehe Each time we pass by Ipoh, we never fail to pack a few rolls home!

All these while I have the perception that Swissroll is a challenge to make... especially the rolling part. It kinda scares me off thus I have never have the courage to try making any... until yesterday!

However, after joining the Munch Ministry FB Group and reading on so many amateur bakers trying their hands on baking a varieties of bakes, I decided to gather my courage to try baking something I really like but does not have the guts before. I am so happy I overcame this fear and bake my very first Swissroll!


Also, it is the strawberry season again (I think there is 2 seasons here in a year!) that I bought so many punnets of strawberries the last few weeks! My kids are more than happy to eat them fresh but a few days ago, my boy asked for cream on cakes. That sparked the idea of making this strawberries and cream Swissroll.

.

Ingredients

(A)
  • 5 Egg yolks

  • 80g Caster sugar (I think can go even lower)

  • 1 tsp Vanilla extract

  • 2 tsp Melted butter

  • 60g Heavy cream (Whipping cream)

  • 1 tsp Lemon zest (I put almost 1tbsp as I have so many lemons!)

  • 1 tsp Fresh lemon juice

  • 55g Cake flour

(B)
  • 5 Egg whites

  • ½tsp + 2 pinches of Cream of tartar

  • 95g Caster sugar

  • Pinch of salt


Cream filling
  • ½ Cup of Whipping cream (I used 1 cup as my kids love extra cream)

  • 4 tbsp Icing sugar

  • 1tsp Vanilla extract

  • Hulled strawberries and cut into small chunks or quartered


Methods
  1. First, line a 10 inch x 15 inch baking try by spraying some oil onto the pan so the parchment paper will stick onto the pan. Leave aside.

  2. Start with (A). Cream the egg yolks with the caster sugar with a whisk until pale and creamy. You can use a mixer too which can be done faster!

  3. Add in the vanilla extract, mix well then followed by the melted butter, heavy cream, lemon zest and the lemon juice while continue whisking.

  4. Sift in the cake flour and gently fold in using a rubber spatula. Set aside.

  5. Move on to (B). In a mixer mixing bowl, beat egg whites till foamy then sprinkle in the cream of tartar. Then slowly pour in the caster sugar in mid speed. Once all the sugar has been mixed in, switch your mixer to high speed and beat till stiff peak.

  6. Take about ¼ of (B) and fold into (A) in one direction gently and not compressing the air in the egg white. Continue with the rest of the egg white. Your batter should be runny now and in pale creamy yellow.

  7. Pour into baking try and bake in 170ºC preheated oven for about 20 minutes then increase to 180ºC degree for another 3 minutes.

  8. Leave it in the oven with door ajar (this is to avoid the sudden drop of temperature) for a few minutes before cooling on rack.

  9. Prepare the cream for filling by whipping it with icing sugar and vanilla extract till stiff peak using a mixer. Chill it in the fridge.

  10. When cake is completely cooled, spread the chilled cream onto the entire cake surface but keep the end thinner so your cream will not get squashed out after you rolled your cake.

  11. Place all the cut strawberry chunks onto the cake and slowly roll peeling the parchment paper along as you roll. There maybe some batter that will stick onto the paper but don't worry, just continue rolling.

  12. Once you are done, throw away the parchment paper and wrap your cake with a fresh piece of parchment paper to keep the shape. Chill in the fridge for at least 10 minutes before cutting. I blast chill in the freezer :P

  13. Cut both ends away for a better presentation.

Tuesday, August 14, 2012

Marbled Chiffon Cake

Though I've been baking cakes for years but I do not have the courage to bake any chiffon cakes even when I've already bought the pan for more than 2 years! I heard of the intricacies involved and it just scares me off! I lurve chiffon cakes since I was a young girl as I just love the fluffiness. Since my mom is not keen to bake so I will usually get my pandan chiffon fix every weekend from the bread and cake stall at the pasar malam (night market). Now that we have moved to Melbourne, chiffon cakes does not come cheap. So, no choice, gotta DIY!

Over the past few weeks, I have been experimenting with some recipes that I got online. I tried a few and so far only get 2 successful cakes out of the four I attempted. Not bad... 50:50 :lol:

The first was a chocolate chiffon... it was so good that it was gone within minutes I took it off the pan! Don't even have chance to snap any nice photos! Will have to make again so I could share the recipe here. :) Then I attempted the pandan chiffon and both attempts was sort of a failure. First was too dense and second, I put the wrong ingredients so it collapsed! :lol:

Then a friend shared with me her 'fool proof' recipe from Agnes Chang's recipe book. It was supposed to be a basic chiffon but I tweaked it to make a marbled chiffon instead. And tadaaaa....

.

.

The texture of the cake is pretty spongy and not too sweet. The cocoa powder gave a very fragrant aroma to the cake. This is definitely a keeper! :)

.

Ingredients

(A)

  • 5 Egg yolks

  • 150g Self raising flour (take away 2 tbsp and replaced with cocoa powder)

  • 75g Castor sugar (I only used 60g)

  • 5tbsp Vege/Conola/Corn Oil

  • 5tbsp Water

(B)

  • 5 Egg whites

  • ½tsp Cream of Tartar

  • 75g Castor sugar


Methods
  1. In a mixing bowl, cream egg yolks with caster sugar till well mixed. Add in the vege oil, mix well. Add in the water and beat till fluffy before sift in the flour except the cocoa powder. When all combined, take half of the batter out into another mixing bowl and mix with the cocoa powder (best to sift first).

  2. Whisk the egg whites using a mixer till fluffy and slowly add in the sugar then the cream of tartar. Whisk on high till it reached stiff peak.

  3. Divide the egg white into 2 even portions. Slowly fold in (in one direction) into both the egg yolk batter with a rubber spatula.

  4. Fill a 22cm (or a smaller if you like tall cake) chiffon pan alternating both batter to get the marbling effects.

  5. Bake in preheated oven at 150ºC for 30 minutes till light brown and increase to 180ºC for about 20 minutes or till golden brown.

  6. Leave the cake in the oven with oven door ajar for a few minutes before inverting it and leave it to cool before taking the cake out.


In the original recipe, all you need to do is to combine A and mix well then add in B since no cocoa powder was involved.

Friday, August 10, 2012

Creamy Caramel Popcorns with HCP

Like many Asian moms, I am on the HCP bandwagon too! I purchased my HCP or commonly known as Happy Call Pan which is from Korea months before but only got to use it after my confinement was over. My mom brought it over from Malaysia when she came over to help me with my confinement.

So, for the last 3 months I have been using this very versatile pan to do most of my cooking. This pan is really good as I can use minimal oil to do stir frying. In fact it can fry fish without using any oil so there will be no oil splattering on the stove top! However, I don't fry fish all the time since the hubby prefer steamed fish.

Two weeks ago, while shopping at Target, they were promoting this handy popcorn maker and gave out free popcorns. My girl has 2 servings and began to bug me for more. Feeling a little embarrassed, I told her that I'll make them for her since I knew my HCP can do the job. Also, I am missing those sweet and crunchy popcorns we used to buy from the cinema so I was so eager to try making them! :D

.

.

I went to get some corn grains from the supermarket and tested them out. The first try was not so successful as the corn grains did not popped properly. There were many un-popped grains. Thus, I went to search for the popping corn grains and was lucky I found a grocer nearby my place that has it. It was selling much cheaper too! Was so happy to get fluffy looking popcorns. :)

Next was having the perfect caramel to coat these fluffy pops. Tested out 2 different recipes for the caramel sauce with the first one too oily and decided to try the second which has cream. I tweaked the recipe and finally got a good combo.

.

Ingredients
  • ½ cup Corn grains

  • 2tbsp Oil

  • 50g Butter

  • ¾ cup Raw sugar

  • 2tbsp Honey

  • 2tbsp Thick cream

  • A pinch of salt


Methods
  1. Line a baking tray or a big mixing bowl with parchment paper.

  2. Heat up both sides of the HCP using medium flame for a minute.

  3. Heat up the oil for a minute and toss in a corn grain to test. If the oil is hot enough the grain will 'dance' in the hot oil before it pops.

  4. Toss in the rest of the corn grains, stir them a little and make sure all are coated with oil before you close and lock the pan.

  5. When they are ready, you'll hear popping sound. Shake the pan a bit and turn to small flame. Move the pan around so that every area get heated. Off the flame when the popping sound stopped.

  6. Move all the popcorns to the prepared tray or bowl.

  7. Clean the HCP off all the residue from the popcorns with a kitchen towel.

  8. Heat the pan again and melt the butter. Add in the sugar and stir continuously till all are well mixed. Sprinkle in the salt.

  9. When the butter and sugar mixture starts to boil and you can see it bubbles, stir and switch to small flame and continue stirring for another 3 or 5 minutes.

  10. When it starts to brown, add in the honey and thick cream and stir till well mixed and let it continue to caramelize.

  11. Once the caramel turn darker brown, switch off the fire and very quickly pour it over the popped corns. You have to do this very quickly as the caramel solidify very fast. Give the the popcorns and caramel a quick stir so all the popcorns will be coated.

  12. Store in air tight containers if you want to consume later.

Monday, July 23, 2012

Stir Fry Bowties Pasta

My kids prefer to eat noodles and pasta over rice but my hubby is a rice barrel! Can't satisfy everyone's preference so I told them to compromise that only on weekends we get to have noodles. So far the arrangement is working fine.  :)

So, to keep my promise, the kids get to have their noodles or pasta on weekends. Sometimes I will do the regular Hakka or Cantonese fry but pasta is cheap here so beside using them in pasta type of dishes, I will either use them for noodles soup or stir fry them.

Also, I've been using my HCP (Happy Call Pan) to do most of the frying which is very convenient and less oil splattering onto my stove top.


.

Ingredients

  • 150g Bowties pasta

  • ¼ of Red Capsicum - strips

  • ¼ cup of Green pea

  • 100g of Meat (chicken or pork cut into thin strips)

  • 1 small stick of Carrot - sliced

  • ½tsp Garlic -minced

  • Soy sauce

  • Black sauce

  • Pepper

  • Mirin (Japanese sweet cooking wine)

  • Raw sugar

  • Salt

  • Olive oil

.

Methods

  1. Marinade the meat with some soy sauce, black sauce, pepper and mirin and set aside.

  2. In a small pot, boil half a pot of water added with some salt and cook the pasta till al-dante (at a chewy stage), drain away the water and sprinkle some olive oil to keep them apart.

  3. In a frying pan (in this case in the HCP) saute the minced garlic with a tsp of oil till fragrant.

  4. Toss in the marinated meat and stir fry till brownish and 80% cooked.

  5. Add in the capsicum, then the peas and carrot and continue to fry for 2 minutes or so. If using HCP, you can click and lock it.

  6. Toss in the cooked pasta and stir to mix them well (if using HCP, you can lock and flip the pan)

  7. In a small bowl, mix some soy sauce, dark soy sauce, raw sugar, pepper and about ¼ cup of water and pour over the pasta and vege mix. Stir till well mix.

  8. Serve while hot!

Friday, July 20, 2012

Home Made Pickled Chilies

One thing about being an Asian is the love for chilies. We are so used to having chilies in our food that one day without chilies is like we are missing something. Especially when living in a foreign country where having chilies in their food is not a norm, we will have to plant our own else it will be so expensive to buy them from the market.

We are so fortunate to have friends who have been here for a while and planted some essential Asian plants which not easily found or should I should I say not sold cheaply. A month ago, our good friend gave my hubby a pot of bird eyes chilies and that magic tree has a good harvest not long after we got it. There was so many ripe chilies and we had difficulties finishing and worried that they might get rotten, I decided to pickled them.

It was not difficult and I am glad the chilies can be kept longer in the vinegar solution. Surprisingly, its level of heat remained unchanged too! It is common to have pickled green chilies and it is uncommon to have pickled bird eyes chilies but after this experiment, I think they are just the same!


.

.

Ingredients

  • 1 Glass jar

  • Bird eyes chilies (slightly more than 1 cup) - depending on the size of your container

  • ½ cup Vinegar (depends on the size of your container)

  • 2tbsp Sugar

  • Some salt

.

Methods

  1. Clean jar and make sure it is dry.

  2. Wash and dry chilies. Cut away the stems and coat with some salt for a few minutes. Was off and dry the chilies with paper towel.

  3. In a sauce pan, heat up the vinegar and sugar and stir till the sugar dissolved.

  4. Arrange chilies into jar almost to the brim (best to leave a little space).

  5. When the vinegar solution comes to a boil, pour into jar with chilies and use a clean spoon or chopsticks to compress all the chilies until there are no more space and bubbles in the jar. Fill with more chilies to the brim.

  6. Close the jar tightly and leave it on the table for a few days before consuming.

.

Tips: Make sure the lid of your jar is not made of metal as it will get rusty when in contact with vinegar. Use a piece of plastic to separate between the glass jar and the metal lid.

Thursday, July 19, 2012

Simple Meaty Lasagne

We visited Rome and Milan during our honeymoon but the ironic thing is, we never really eat what the Italians eat except pizza! Yes, no kidding... we only had a few slices of pizzas as I was so sick with morning sickness that I don't have much appetite for any food well, except a few cones of gelato! What a shame! :P

Back then I was not so interested in Italian food and cheesy stuff don't appeal to me since I had lactose intolerance. My tummy will have a fit each time I eat cheese except mozzarella so I avoid them at much as I could.

However, when we moved to Melbourne, cheesy food seems to be everywhere! Well, one thing is that, cheese is so much cheaper here compared to Malaysia and the kids love to have cheesy stuff once in a while. Darrius is a fan of cheese and of all things he only ordered lasagne from his school canteen!

One day I saw a big lasagne dish on sale in one of the supermarket and decided to get one so I could cook my own lasagne. Checking the net and found a few recipes but most have béchamel sauce which I was reluctant to do as I don't have so much time to spare. So, I decided to go for the simplest where I used bottled bolognese sauce andwith added vegetables.

I can tell you the aroma from the browning cheese (mozzarella) filled the entire kitchen and it was oh so good! :lol:  The dish was rather huge so we have half of it as left over. I cut them into a few snack size portions and freeze them so I can have it whenever I have the cravings while having some bingo games when the kids are sleeping :D I know it is sinful but it was really satisfying!

Since I still have some left over lasagne sheets, I might be baking another dish soon when I finished the frozen batch.


Ingredients

  • 1kg Mixed ground beef and pork (I used 50/50)

  • 1 jar of Bolognese or pasta sauce of your choice

  • 1 can of Tomato paste (optional)

  • 1 Zucchini - cut into thin slices or diced

  • 2 sticks Carrots - diced

  • 1 cup Peas (I used frozen peas)

  • 1 jar of Bolognese or pasta sauce of your choice

  • 1 Onion - diced

  • 3 pips Garlic - smashed

  • 1 cup Water

  • Olive oil for stir frying

  • Salt and pepper to taste

  • Lasagne sheets

  • 1½ cup Cheddar cheese - grated

  • 1½ cup Mozzarella cheese - grated

.

Methods

  1. Heat up frying pan with some olive oil and sauté the vegetables (garlic, onion, zucchini, carrot and peas), lift up and set aside then in the same pan stir fry the ground meat till 80% cook.

  2. Add in pasta sauce, tomato paste and water to the cooked meat, stir till well combine, toss in the sautéed vegetables and stir till well mixed. Add in salt and pepper to taste.

  3. In a sauce pan, boil water with some salt to slightly soften the lasagne sheets (if you are not using fresh lasagne sheets).

  4. Fill the first layer of your lasagne dish with some of the bolognese/pasta sauce, line with lasagne sheet, sprinkle with some cheddar and mozzarella, pasta sauce, lasagne sheets and so on until all your pasta sauce is used up.

  5. Topped the dish with lasagne sheets, a layer of cheddar and lastly the mozzarella to get the browning effects on the surface.

  6. Bake in a preheated oven of 190ºC for 30 minutes and turn to 200ºC for another 10 minutes or till the surface is brown or slightly burn.

Tuesday, July 17, 2012

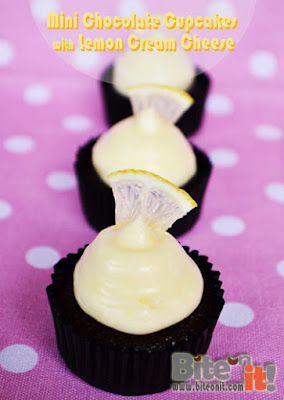
Mini Chocolate Cupcake with Lemon Cream Cheese

Some friends asked me why I have been posting dessert only posts lately? Well, very simple... I've taken my Kitchen Aid out and my hands are itchy to try out all those recipes which I have been collecting over the years. I must say, it was fun and therapeutic especially when the kids are making havoc in the house! :P

Last weekend, we were invited to our friends' son's birthday so we can't be going there empty handed. Decided to bake something as contribution (which is a norm in Australia when there is a makan-makan session!) to the little party. I knew there will be a lot of food so making bite size food will be ideal. Also, I wanted to use up some of the lemons which were given by another friend.

.


This is the first time I've used cream cheese for frosting my cakes (the cold weather here is perfect!) as the acidity from the lemon juice and lemon zest made the chocolate cakes taste superb! It was a winning combo!!

.

.

Ingredients (Mini Chocolate Cupcake)

  • 113g Butter - room temp

  • 120g Castor Sugar

  • 3 Eggs - room temp (I used medium sized eggs)

  • 103g All purpose flour

  • ½ teaspoon baking powder

  • ¼ teaspoon baking soda

  • Pinch of salt

  • 43g Unsweetened cocoa powder

  • 120ml Milk

  • 1 tsp Vanilla essence

(This recipes yields about 2 dozens mini cupcakes)

.

Methods

  1. Beat butter until softened. Add sugar and beat on high until light and fluffy.

  2. Add in eggs, one at a time, beating until well combined.

  3. In a small mixing bowl, sieve flour, baking powder, baking soda, salt, and cocoa powder, mix to combine.

  4. In another bowl, mix the milk and vanilla and stir to combine

  5. Add about a third of the dry ingredients to the butter batter and beat to combine. Add about a half of the milk/vanilla and beat to combine. Continue adding, alternating between dry and wet and finishing with the dry.

  6. Scoop batter into cupcake cups about 2/3’s full (the cakes will not rise a lot as this recipe is not a dome cake recipe... it is flat top which is ideal for frosting)

  7. Bake cupcakes in preheated oven and bake at 170°C for 15-18 minutes or until cake tester comes out clean.

Frosting

  • 1 block (250g) of Philadelphia Cream Cheese

  • 1 Cup Icing/Confectioner sugar

  • 1tbsp Lemon juice (freshly squeeze)

  • 1tsp Lemon zest


  1. Mix cream cheese and sugar in the mixer bowl, beat till well combine, add in lemon juice and lemon zest and beat till light and fluffy.

  2. Fill cream cheese into piping bag and pipe out onto cooled cupcakes.

.

.

Cupcake recipe is adapted from here

Wednesday, July 11, 2012

Strawberries on Cream Sponge Cake

You will not believe if I tell you that I've never attempted making any sponge cake! Unbelievable yeah? For someone who used to have a cupcake blogshop, this is indeed rare! Most people would have thought that I can whip up any types of cakes but in actual fact, there are so many varieties which I have yet to attempt.

Since we are putting on a lot of weight in this cold weather, I tried not to consume too much fatty food. They kids have been putting on lots of weight too so I have to go for alternatives to cut down on our oil & sugar consumption. For healthier choice, instead of cooking with butter, I'll go with sunflower or canola oil. I'll try to use brown sugar for cooking and baking whenever possible.

While the kids have been pestering me to bake more cakes for them, I opted to make sponge cake which uses vegetable oil oppose to butter cake. For that, my sponge cake journey begins...

I throng the net looking for some easy to make sponge cake recipes and was glad to compile a few recipes and modified them accordingly so I'll have my very own sponge cake recipe that works for me. The initial recipe was adapted from here.

With the cheap winter strawberries in season... I took the opportunity to make this really light and airy sponge with with cream topped with sliced strawberries which was a hit with the family! :D

.

.

Ingredients

(A)
  • 1 Eggs (whole)

  • 4 Egg yolks

  • 50ml Sunflower oil (or any non fragrant oil)

  • ½tsp Vanilla essence

(B)
  • 50g Cake flour (low gluten flour)

(C)
  • 4 Egg white

(D)
  • 50g Castor sugar

  • ¼tsp Salt


Method
  1. Beat (A) with a whisk till well mixed in a big mixing bowl.

  2. Slowly sieve in (B) into (A) till well combine.

  3. Using the whisk attachment on your mixer beat (C) till frothy and add in (D) and beat till stiff peak.

  4. Fold in the egg white & sugar mixture into the egg yolk mixture in a few additions but not over beating but making sure they are well combine. It is okie if you can still see patches of egg white foam in the batter.

  5. Pour into two baking tins (I used a 6" round tin) lined with parchment paper.

  6. Bake at 170 (or depending on your oven's heat) for about 20-25 minutes or till cake tester comes out clean. It should rise 2x the height of the batter.

  7. Leave the baked sponge in the oven with its door ajar for a few minutes before taking it from the tin and leave it cool upside down on a cooling rack.


Cream & Decorations
  • 1 punnet Fresh strawberries hulled and sliced thinly

  • ¼ punnet strawberries cut into small chunks

  • 1 cup Whipping cream

  • 3 tbsp Castor sugar

  1. Whip the cream with sugar in high till it foams stiff peak.

  2. Spread some of the whipped cream on top of one sponge, sprinkle with the strawberry chunks and another another layer of whipped cream.

  3. Stack the 2nd sponge, spread a layer of whipped cream on top and decorate with sliced strawberries...

Tuesday, June 26, 2012

Strawberry & Banana Muffins

I thought only during spring and summer the strawberries are on sale but was surprised to find 'winter strawberries' in Aldi last weekend so bought a few boxes! And guess what? They were sweet! :D

There were some ripe bananas on the counter and I thought why not bake some muffins? And how about adding some strawberries since I have so many??? They were yummy!!! The sweetness from the banana is neutralized by the mild acidity from the strawberries which make them perfect!

I just love them when they are warm!

.

.

Ingredients
  • 2½ cup Self raising flour

  • ¾ cup Raw sugar (you can use brown sugar)

  • 1 cup Milk

  • 1 Egg

  • 2tbsp Sunflower oil (you can use margerine)

  • 1tsp Vanilla essense

  • 2 ripe Banana (mashed)

  • ½ cup Strawberries (cubed and some sliced for deco)


Methods
  1. In a big mixing bowl, place flour, sugar, mashed banana, vanilla essence, milk and margerine together.

  2. Beat egg in a small bowl and pour into the big mixing bowl with the rest of the ingredients and mix them well and incorporated.

  3. Add in the cubed strawberries and mix them into the batter.

  4. Fill into prepared muffin liners in regular muffin pan about ½ full.

  5. Place some sliced strawberry on each cavity before baking in oven at 180ºC.

  6. Yields about 16 muffins.

Friday, June 15, 2012

Mini Herbed Muffins

One night while watching Masterchef, Darrius told me that he wanted to be one of the 3 men who do the tasting! How ambitious is that???!!! :lol: Well, I told him that, before he can be a taster, he must first learn to cook well and be a very good chef. Looks like cooking is in the genes :)

Darrius gets to cook in his school's kitchen (that was one of the reasons why we chose this school) twice a semester. Last week, he got to bake these little herbed muffins and brought some home which tasted pretty nice and he asked if we can make them at home. Therefore, I went to get some cheese and decided to bake a batch to try but I twisted the recipe a little as I did not have all the ingredients but they turned out great :)

.

.

Ingredients
  • 1 cup Self raising flour

  • 1 cup Grated cheese

  • 1 tablespoon Mixed herbs

  • 1 tablespoon Fresh parsley

  • ½ teaspoon Salt

  • 1 teaspoon Sugar

  • 1 Egg

  • ½ cup + 2 tablespoons Milk


Method
  1. Place the flour, cheese, parsley, herbs, salt and sugar in a big mixing bowl and mix them well.

  2. Use another bowl to mix egg and milk and whisk till fluffy.

  3. Slowly pour in the egg and milk mixture into the dry ingredients and fold them together until they are well dampen but not whisk them further.

  4. Spoon mixture into mini muffin tins lightly glazed with some oil or butter.

  5. Bake at 200°C for 10-12 minutes or until cooked (use a pick to poke and it comes out clean).

Thursday, June 14, 2012

SPAM Fried Rice

We seldom eat can food when we are in Malaysia since we can get fresh food at a relatively low prices outside. So, when I am not cooking (too lazy) we'll just walk over to the nearby hawker stall and pack food. However, it is entirely different when we moved to Melbourne. Eating out or buying outside food can be a costly affair. Therefore, we avoid eating out or buying outside food as much as possible. We'll, we can't be eating fast food all the time rite? And the Asian food here sucks... they are all the same... taste and choice wise!

That was why we have started stocking up on can food for convenience sake. The weather can be really cold sometimes and we need to have hot food during these time. The kids and the hubby don't really fancy having sandwiches all the time so I have to think of ways to make food interesting! That is tough job!

Anyway, we have a knack for luncheon meat and when Coles was having ½ price sale for their SPAM, I just can't resist stocking up... after all, can food can be stored for quite a while. Even my mom bought a few cans home when she was here last month cause they are so expensive back in Malaysia! 1 can of SPAM is selling @ RM17.50 in Cold Storage! Insanity!

.


Ingredients
  • 1 can SPAM (I used the one with Bacon variety) - cubed

  • 1 cup Fench beans - diced

  • 1 cup Carrot - diced

  • 1 cup Corn Kernels - drain away the water

  • 3 cup Cooked rice - cooled

  • 2 Eggs

  • 1 tbsp Sauteed minced/chopped garlic

  • Oil for frying


Method
  1. Heat up frying pan with some oil (I used non stick pan so uses less oil) and lightly stir fry the French beans and carrot for about 5 minute on medium fire. Lift up and put aside.

  2. Using the same pan, add in a tbsp of oil and stir fry the the cubed SPAM till they turn brownish, lift up and put aside.

  3. Beat the eggs in a bowl and fry it in the same pan with another tbsp of oil.

  4. Add in the rice into the egg mixture and stir vigorously until they are well mixed.

  5. Toss in the French beans, carrot, corn kernel and SPAM and mix them well.

  6. Add the sauteed garlic and stir for another minute or so until you can hear the 'pop' sound from the hot rice.

Wednesday, March 21, 2012

Flaky Portuguese Egg Tarts

I am not a dessert person nor do I have sweet tooth though I love to bake and decorate cakes! I just love looking at pretty cakes and dessert especially petite four. However, once in a while I do crave for some sweet delights. Like today.

Have been wanting to eat egg tarts for so long so I went around the net and try looking for the simplest recipe to start off with. Also, I need to check the ingredients I have on hand and looking through Su's site, I got one which is extreme simple with minimal ingredients involved! Yippee! :D

I just love how flaky these tarts were and they are not the least sweet! The only down side was... the recipe only yields 6 tarts...

.

.

Ingredients
  • ¼ cup Full cream milk

  • ¼ cup Whipping cream

  • 4 tbsp Castor sugar

  • 3 Egg yolks beaten

  • 300g Puff pastry


Methods
  1. Pre-heat oven to 200C (depending on your oven)

  2. Pour full cream milk and whipping cream into a glass bowl and put into microwave oven for 2 minutes.

  3. Once boil, remove from microwave and add in the sugar, mix till dissolved. Heat in the microwave for another 45 seconds.

  4. Take out and add in the beaten egg yolks in a thin stream with a balloon whisk.

  5. Cut out the puff pastry using the biggest circle (which can line your cupcake tray mould). Line the mould with at least 2 layers of the biggest circle and another one smaller circle (1cm smaller) and lightly press the pastry to fill up the mould.

  6. Slowly pour in the mixture into all the shells and pop into oven for 30mins or until you see the centre pop up with brownish sides...

Monday, March 19, 2012

Japanese Steamed Cake (Mushipan)

Oh dear! It has been ages since I posted here!! Not that I have stopped cooking, just that I really don't have much time to edit the photos and making the effort to post. However, I have tried posting more on my bento creations as that has been an integral part of my daily must do since my boy goes to formal school now.

Also, we are adjusting to our new life here in Melbourne (we've just migrated here 2 months ago) so there are so much to do since a couples of months back. Not to mention I was down with severe morning sickness (yeah, it is my 3rd one!) since last August... which explained my disappearance.

Ever since moving here, I have been cooking quite a fair bit as eating out is expensive here but I kept to the favorite few recipes which are fool proof with the family.

With the kids getting older, they knew how to make requests and sometimes I just feel I need to do my bit as a mommy and give them the treats they deserved. Lately, they have been asking for cakes (and cakes sold at the supermarts are so darn sweet!) so I tried looking for simple recipes which is fast, yummy and healthy. Electricity is expensive here so I try to avoid baking with oven so steaming is the best option!

Previously, I tried making the Steamed Banana Cupcakes but that recipes is not totally fool proof (it can be quite hard sometimes) so I tried to search for another and was glad I found one which is healthy and with minimal ingredients too! You can find the original recipe here as I've twisted the ingredients a little to suit our taste buds (you can get creative and come up with various ingredients that you like!). It is actually a type of Japanese tea-cake which is called mushipan. I just love the light and fluffy texture when it is fresh out of the steamer!

.


.

Ingredients (Yields 8-9 medium sized cupcakes)

  • 200g Plain flour

  • 2tsp Baking powder (I used double action)

  • 2 Eggs (60g each)

  • 50g Castor sugar (I used brown sugar)

  • 100ml Water

  • 2tbsp Vegetable oil

  • 2 Bananas (Diced and kept some for topping)

.

Methods

  1. Sieve flour and baking powder in a big bowl. Set aside.

  2. Beat eggs and sugar till fluffy and add in the vegetable oil and beat till well mixed.

  3. Mix the water and egg mixture alternately into flour until you get a thick batter.

  4. Heat up steamer/wok with water.

  5. Lined moulds with cupcake cups while you add in the diced banana into the batter before filling the cupcake cups to 2/3 full. Sprinkle some diced banana on top before sending them into the steamer.

  6. Depending on size of your cupcake mould... it should takes about 10-12 minutes to cook...