Pages

Monday, July 23, 2012

Stir Fry Bowties Pasta

My kids prefer to eat noodles and pasta over rice but my hubby is a rice barrel! Can't satisfy everyone's preference so I told them to compromise that only on weekends we get to have noodles. So far the arrangement is working fine.  :)

So, to keep my promise, the kids get to have their noodles or pasta on weekends. Sometimes I will do the regular Hakka or Cantonese fry but pasta is cheap here so beside using them in pasta type of dishes, I will either use them for noodles soup or stir fry them.

Also, I've been using my HCP (Happy Call Pan) to do most of the frying which is very convenient and less oil splattering onto my stove top.


.

Ingredients

  • 150g Bowties pasta

  • ¼ of Red Capsicum - strips

  • ¼ cup of Green pea

  • 100g of Meat (chicken or pork cut into thin strips)

  • 1 small stick of Carrot - sliced

  • ½tsp Garlic -minced

  • Soy sauce

  • Black sauce

  • Pepper

  • Mirin (Japanese sweet cooking wine)

  • Raw sugar

  • Salt

  • Olive oil

.

Methods

  1. Marinade the meat with some soy sauce, black sauce, pepper and mirin and set aside.

  2. In a small pot, boil half a pot of water added with some salt and cook the pasta till al-dante (at a chewy stage), drain away the water and sprinkle some olive oil to keep them apart.

  3. In a frying pan (in this case in the HCP) saute the minced garlic with a tsp of oil till fragrant.

  4. Toss in the marinated meat and stir fry till brownish and 80% cooked.

  5. Add in the capsicum, then the peas and carrot and continue to fry for 2 minutes or so. If using HCP, you can click and lock it.

  6. Toss in the cooked pasta and stir to mix them well (if using HCP, you can lock and flip the pan)

  7. In a small bowl, mix some soy sauce, dark soy sauce, raw sugar, pepper and about ¼ cup of water and pour over the pasta and vege mix. Stir till well mix.

  8. Serve while hot!

Friday, July 20, 2012

Home Made Pickled Chilies

One thing about being an Asian is the love for chilies. We are so used to having chilies in our food that one day without chilies is like we are missing something. Especially when living in a foreign country where having chilies in their food is not a norm, we will have to plant our own else it will be so expensive to buy them from the market.

We are so fortunate to have friends who have been here for a while and planted some essential Asian plants which not easily found or should I should I say not sold cheaply. A month ago, our good friend gave my hubby a pot of bird eyes chilies and that magic tree has a good harvest not long after we got it. There was so many ripe chilies and we had difficulties finishing and worried that they might get rotten, I decided to pickled them.

It was not difficult and I am glad the chilies can be kept longer in the vinegar solution. Surprisingly, its level of heat remained unchanged too! It is common to have pickled green chilies and it is uncommon to have pickled bird eyes chilies but after this experiment, I think they are just the same!


.

.

Ingredients

  • 1 Glass jar

  • Bird eyes chilies (slightly more than 1 cup) - depending on the size of your container

  • ½ cup Vinegar (depends on the size of your container)

  • 2tbsp Sugar

  • Some salt

.

Methods

  1. Clean jar and make sure it is dry.

  2. Wash and dry chilies. Cut away the stems and coat with some salt for a few minutes. Was off and dry the chilies with paper towel.

  3. In a sauce pan, heat up the vinegar and sugar and stir till the sugar dissolved.

  4. Arrange chilies into jar almost to the brim (best to leave a little space).

  5. When the vinegar solution comes to a boil, pour into jar with chilies and use a clean spoon or chopsticks to compress all the chilies until there are no more space and bubbles in the jar. Fill with more chilies to the brim.

  6. Close the jar tightly and leave it on the table for a few days before consuming.

.

Tips: Make sure the lid of your jar is not made of metal as it will get rusty when in contact with vinegar. Use a piece of plastic to separate between the glass jar and the metal lid.

Thursday, July 19, 2012

Simple Meaty Lasagne

We visited Rome and Milan during our honeymoon but the ironic thing is, we never really eat what the Italians eat except pizza! Yes, no kidding... we only had a few slices of pizzas as I was so sick with morning sickness that I don't have much appetite for any food well, except a few cones of gelato! What a shame! :P

Back then I was not so interested in Italian food and cheesy stuff don't appeal to me since I had lactose intolerance. My tummy will have a fit each time I eat cheese except mozzarella so I avoid them at much as I could.

However, when we moved to Melbourne, cheesy food seems to be everywhere! Well, one thing is that, cheese is so much cheaper here compared to Malaysia and the kids love to have cheesy stuff once in a while. Darrius is a fan of cheese and of all things he only ordered lasagne from his school canteen!

One day I saw a big lasagne dish on sale in one of the supermarket and decided to get one so I could cook my own lasagne. Checking the net and found a few recipes but most have béchamel sauce which I was reluctant to do as I don't have so much time to spare. So, I decided to go for the simplest where I used bottled bolognese sauce andwith added vegetables.

I can tell you the aroma from the browning cheese (mozzarella) filled the entire kitchen and it was oh so good! :lol:  The dish was rather huge so we have half of it as left over. I cut them into a few snack size portions and freeze them so I can have it whenever I have the cravings while having some bingo games when the kids are sleeping :D I know it is sinful but it was really satisfying!

Since I still have some left over lasagne sheets, I might be baking another dish soon when I finished the frozen batch.


Ingredients

  • 1kg Mixed ground beef and pork (I used 50/50)

  • 1 jar of Bolognese or pasta sauce of your choice

  • 1 can of Tomato paste (optional)

  • 1 Zucchini - cut into thin slices or diced

  • 2 sticks Carrots - diced

  • 1 cup Peas (I used frozen peas)

  • 1 jar of Bolognese or pasta sauce of your choice

  • 1 Onion - diced

  • 3 pips Garlic - smashed

  • 1 cup Water

  • Olive oil for stir frying

  • Salt and pepper to taste

  • Lasagne sheets

  • 1½ cup Cheddar cheese - grated

  • 1½ cup Mozzarella cheese - grated

.

Methods

  1. Heat up frying pan with some olive oil and sauté the vegetables (garlic, onion, zucchini, carrot and peas), lift up and set aside then in the same pan stir fry the ground meat till 80% cook.

  2. Add in pasta sauce, tomato paste and water to the cooked meat, stir till well combine, toss in the sautéed vegetables and stir till well mixed. Add in salt and pepper to taste.

  3. In a sauce pan, boil water with some salt to slightly soften the lasagne sheets (if you are not using fresh lasagne sheets).

  4. Fill the first layer of your lasagne dish with some of the bolognese/pasta sauce, line with lasagne sheet, sprinkle with some cheddar and mozzarella, pasta sauce, lasagne sheets and so on until all your pasta sauce is used up.

  5. Topped the dish with lasagne sheets, a layer of cheddar and lastly the mozzarella to get the browning effects on the surface.

  6. Bake in a preheated oven of 190ºC for 30 minutes and turn to 200ºC for another 10 minutes or till the surface is brown or slightly burn.

Tuesday, July 17, 2012

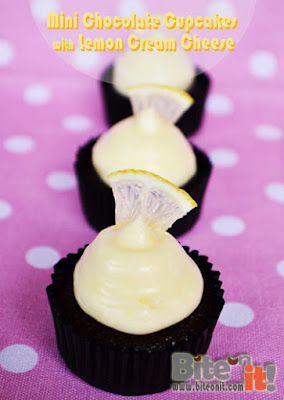
Mini Chocolate Cupcake with Lemon Cream Cheese

Some friends asked me why I have been posting dessert only posts lately? Well, very simple... I've taken my Kitchen Aid out and my hands are itchy to try out all those recipes which I have been collecting over the years. I must say, it was fun and therapeutic especially when the kids are making havoc in the house! :P

Last weekend, we were invited to our friends' son's birthday so we can't be going there empty handed. Decided to bake something as contribution (which is a norm in Australia when there is a makan-makan session!) to the little party. I knew there will be a lot of food so making bite size food will be ideal. Also, I wanted to use up some of the lemons which were given by another friend.

.


This is the first time I've used cream cheese for frosting my cakes (the cold weather here is perfect!) as the acidity from the lemon juice and lemon zest made the chocolate cakes taste superb! It was a winning combo!!

.

.

Ingredients (Mini Chocolate Cupcake)

  • 113g Butter - room temp

  • 120g Castor Sugar

  • 3 Eggs - room temp (I used medium sized eggs)

  • 103g All purpose flour

  • ½ teaspoon baking powder

  • ¼ teaspoon baking soda

  • Pinch of salt

  • 43g Unsweetened cocoa powder

  • 120ml Milk

  • 1 tsp Vanilla essence

(This recipes yields about 2 dozens mini cupcakes)

.

Methods

  1. Beat butter until softened. Add sugar and beat on high until light and fluffy.

  2. Add in eggs, one at a time, beating until well combined.

  3. In a small mixing bowl, sieve flour, baking powder, baking soda, salt, and cocoa powder, mix to combine.

  4. In another bowl, mix the milk and vanilla and stir to combine

  5. Add about a third of the dry ingredients to the butter batter and beat to combine. Add about a half of the milk/vanilla and beat to combine. Continue adding, alternating between dry and wet and finishing with the dry.

  6. Scoop batter into cupcake cups about 2/3’s full (the cakes will not rise a lot as this recipe is not a dome cake recipe... it is flat top which is ideal for frosting)

  7. Bake cupcakes in preheated oven and bake at 170°C for 15-18 minutes or until cake tester comes out clean.

Frosting

  • 1 block (250g) of Philadelphia Cream Cheese

  • 1 Cup Icing/Confectioner sugar

  • 1tbsp Lemon juice (freshly squeeze)

  • 1tsp Lemon zest


  1. Mix cream cheese and sugar in the mixer bowl, beat till well combine, add in lemon juice and lemon zest and beat till light and fluffy.

  2. Fill cream cheese into piping bag and pipe out onto cooled cupcakes.

.

.

Cupcake recipe is adapted from here

Wednesday, July 11, 2012

Strawberries on Cream Sponge Cake

You will not believe if I tell you that I've never attempted making any sponge cake! Unbelievable yeah? For someone who used to have a cupcake blogshop, this is indeed rare! Most people would have thought that I can whip up any types of cakes but in actual fact, there are so many varieties which I have yet to attempt.

Since we are putting on a lot of weight in this cold weather, I tried not to consume too much fatty food. They kids have been putting on lots of weight too so I have to go for alternatives to cut down on our oil & sugar consumption. For healthier choice, instead of cooking with butter, I'll go with sunflower or canola oil. I'll try to use brown sugar for cooking and baking whenever possible.

While the kids have been pestering me to bake more cakes for them, I opted to make sponge cake which uses vegetable oil oppose to butter cake. For that, my sponge cake journey begins...

I throng the net looking for some easy to make sponge cake recipes and was glad to compile a few recipes and modified them accordingly so I'll have my very own sponge cake recipe that works for me. The initial recipe was adapted from here.

With the cheap winter strawberries in season... I took the opportunity to make this really light and airy sponge with with cream topped with sliced strawberries which was a hit with the family! :D

.

.

Ingredients

(A)
  • 1 Eggs (whole)

  • 4 Egg yolks

  • 50ml Sunflower oil (or any non fragrant oil)

  • ½tsp Vanilla essence

(B)
  • 50g Cake flour (low gluten flour)

(C)
  • 4 Egg white

(D)
  • 50g Castor sugar

  • ¼tsp Salt


Method
  1. Beat (A) with a whisk till well mixed in a big mixing bowl.

  2. Slowly sieve in (B) into (A) till well combine.

  3. Using the whisk attachment on your mixer beat (C) till frothy and add in (D) and beat till stiff peak.

  4. Fold in the egg white & sugar mixture into the egg yolk mixture in a few additions but not over beating but making sure they are well combine. It is okie if you can still see patches of egg white foam in the batter.

  5. Pour into two baking tins (I used a 6" round tin) lined with parchment paper.

  6. Bake at 170 (or depending on your oven's heat) for about 20-25 minutes or till cake tester comes out clean. It should rise 2x the height of the batter.

  7. Leave the baked sponge in the oven with its door ajar for a few minutes before taking it from the tin and leave it cool upside down on a cooling rack.


Cream & Decorations
  • 1 punnet Fresh strawberries hulled and sliced thinly

  • ¼ punnet strawberries cut into small chunks

  • 1 cup Whipping cream

  • 3 tbsp Castor sugar

  1. Whip the cream with sugar in high till it foams stiff peak.

  2. Spread some of the whipped cream on top of one sponge, sprinkle with the strawberry chunks and another another layer of whipped cream.

  3. Stack the 2nd sponge, spread a layer of whipped cream on top and decorate with sliced strawberries...