Pages

Sunday, September 20, 2020

Kuih Bingka Ubi (Baked Cassava/Tapioca Cake)

I am not a huge fan of sweet food but I like cooking or baking them. When we first moved here, its not easy to find a lot of food that we used to eat back home. Over time it gets better but sometimes it can be costly and the taste may not suite our taste buds. Luckily with internet, I get to learn to cook a lot of food that we enjoyed from other people's sharing be it in Facebook or YouTube. 

Kuih bingka ubi is one of my hubby's favorite kuih. Previously it was hard find fresh ubi kayu/cassava, the main ingredient for bingka ubi here in Melbourne. Then a friend told me a couple of years ago that its ok to use frozen grated cassava. That means it so much more convenient! 

Over the past 2 years I have experimented with a few recipes but most uses desiccated coconut. Then stumbled onto this recipe shared by Shiokman Eddie. I like its texture as it is not as hard as those that have desiccated coconut in the mix. 


Ingredients


1kg       Grated cassava/tapioca or 2 packets of frozen cassava (500g each)
180g     Sugar
350g     Coconut milk
¼ tsp    Salt
2           Eggs
20g       Butter at room temperature


Methods

  1. In a bowl add sugar to the grated cassava/tapioca and mix them up till combined.
  2. Add in coconut milk, salt and the eggs.
  3. Mix all the ingredients thoroughly.
  4. Add in the soften butter at room temperature and mix well.
  5. Line a 10" square tin or a smaller tin (I used 7") if you want a taller kuih with baking paper, line the bottom with a piece of banana leaf and slowly pour in the mixture.
  6. Spread the mixture evenly with a spatula.
  7. Bake in a preheated oven at 160°C for 1 to 1½  to 2 hours.
  8. Do check after 1 hour into baking.Continue to bake till the surface is crispy golden brown and when skewer comes out clean.
  9. Remove kueh from baking tin and set aside to cool on a wire rack.
  10. Use a plastic knife or oiled knife to cut.


Saturday, September 19, 2020

Air Fried Roast Pork Belly on Dry Egg Noodles

Roast pork belly or siew yuk on egg noodles is one of my family's all time favorites! Usually we will savor this dish at one of our favorite Hong Kong restaurants but due to the 5km restrictions which was enforced since mid of August, we are unable to visit. Everyone has been missing their their siew yuk so no choice but to cook our own. 

This version is pretty easy and with the use of my air fryer, there's no dirty oven to clean. Pretty stoked with how it turned out too! The skin crackled beautifully making it really crispy. 


Ingredients

for Roast pork belly

  • 1 slab         Pork belly (about 1 to 1.2kg with a bit of fat under the skin)
  • 1"               Ginger  
  • 1 scallion   Spring onion
  • 1 tbsp        Chinese wine
  • 1 tsp          Salt
  • 1 tsp          Five spice powder
  • 1 tsp          White pepper
  • 1 tsp          White vinegar
  • Coarse salt for covering pork skin 


Methods

  1. Wash and clean pork belly by using a knife scrapping away dirt on the skin. Remove hair with a tweezers if there's any.
  2. Heat up half a pot of water (big enough to fit the entire piece of pork belly) and once boiling, add in the spring onion, ginger slices and 1tsp of Chinese wine. Slowly slide the pork belly in skin down into the pot making sure water covering the pork belly and let it boil for 20 mins.
  3. Remove pork belly and let it cool on a plate. Using a fork, poke the skin all over. Using a kitchen towel, wipe dry any excess liquid on the skin.
  4. In a small bowl, mix the five spice powder, salt and pepper. Make a few slits on the meat side and rub the spice mixes all over. Do not rub on the skin. Make sure you dry the skin with a paper towel. Brush the vinegar onto the skin. Keep in the fridge overnight.
  5. Lay out a piece of aluminium foil big enough for the the piece of pork belly with at least 5cm to 7cm to spare all around. Lay another piece of baking paper smaller than the aluminium foil inside but enough to cover the side of the pork belly. Fold up all the sides (to protect the meat from drying out) and leave the the skin expose. 
  6. Spread enough salt covering the entire skin before putting into air fryer for 20 mins at 200°C.
  7. Removed all the salt and air fry a further 15 mins at 200°C.
  8. Cool the the pork belly on a wire rack before chopping into desired size.


Dry Egg Noodles (per serve)

  • 100g        Egg noodles (loosen)
  • 1 tsp        Light soy sauce
  • 1 tsp        Dark soy sauce
  • 1 tsp        Pork lard
  • 1 tsp        Oyster sauce
  • ½ tsp       Sesame seed oil
  • ½ tsp       Garlic oil
  • 2 tbsp      Hot water or chicken broth
  • A dash of pepper


  1. Heat up a pot of water and prepare a bowl of cold water. Place all the sauces into a plate.
  2. Once water is boiling, toss the loosen noodles into pot. Stir so it is not sticking to the pot. Let noodle boil for 30 to 40 secs in medium heat.
  3. Take out noodles and toss into the bowl of cold water and stir it around to stop it from cooking further for 30 secs.
  4. Return the noodles into pot and cook it for 10 secs and toss into plate with all the sauces. Mix well to coat noodles.
  5. Arrange chopped up roasted pork belly onto noodles and garnish with some blanched green choy sum or bok choy.


Friday, September 11, 2020

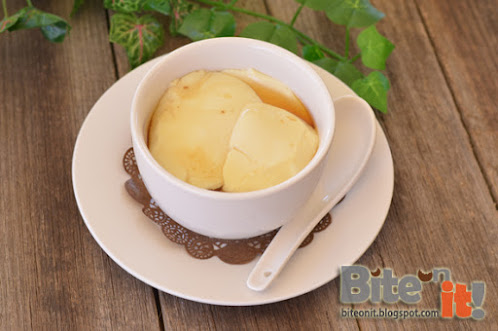
Tau Fu Fa using GDL

A couple of years ago some of us discovered about using GDL (Glucono delta-Lactone) to make tau fu fa or soy bean curd, a dessert loved by many. What make it so interesting is that we can actually use store bought unsweetened soy bean milk from the Asian grocers to make it. That was really exciting as the process of making your own soy milk is very tedious and time consuming. We were pleasantly surprised that the tau fu fa made with GDL turned out as smooth as those that used gypsum powder. For that, we can save so much by making our own instead of ordering from yum cha parlors 😄


Ingredients

  • 2L         Unsweetened soy bean milk (Yensons brand recommended)
  • 1tsp      GDL
  • 1tsp      Corn flour
  • 1tbsp    Water
Syrup
  • 4 slices  Ginger
  • 200ml    Water
  • Sugar or Brown sugar to taste


Methods

  1. Heat soy bean milk in a pot under medium fire till it reaches 95°C stirring all the time with a whisk to avoid the bottom from burning.
  2. In another stock pot or thermal pot, mix GDL and corn flour with water.
  3. Once the soy bean milk reaches 95°C, pour it over the GDL mix from a feet above the pot. This helps to mix the GDL with the soy bean milk well.
  4. Cover the pot and do not move it for at least 45 mins to an hour. 
  5. In a milk pot, boil water with ginger and sugar/ brown sugar to desired sweetness.
  6. Once the soy bean milk has been solidified, scoop with a flat spoon into bowl and drench with the ginger syrup. 


Thursday, September 10, 2020

Braised Pork (Tau Ew Bak)

One of the most popular dish in our household is this Penang Hokkien braised pork dish which is popularly know as Tau Ew Bak. Hubby and the kids just love this dish and they can eat every week if I will actually cook it! This is my go to dish when I'm out of ideas of what to cook. It's easy and the gravy is great for soaking up your rice.

I've done the gravy really wet and also thick and dry. Somehow it is still better with more gravy so I can add some hard boiled eggs to add on as additional fillers.


Ingredients

  • 1 kg          Pork belly (best with those that has a few layers of fats and with skin intact)
  • 10 cloves Garlic - slightly mashed
  • 1tsp          Peppercorns - crushed
  • 2               Star anise
  • 2tbsp        Black soy sauce (thick caramel)
  • ½ tbsp       Salt
  • 1tbsp        Light soy sauce to taste (optional)
  • 2 cups      Water (can add more)
  • 6 no.         Half boiled eggs
  • Oil for frying


Methods

  1. Cut pork belly into 1" cubes. 
  2. Heat up wok or cast iron pot with 2 to 3 tbsp oil. 
  3. Saute the garlic, star anise and peppercorns for about 2 minutes till fragrant.
  4. Toss in the pork cubes and stir till all sides are seared through. 
  5. Add in all black sauce and stir till all pork cubes are covered. Let cook for 2 minutes.
  6. Pour in water (enough to cover the pork), stir and cover for 15 minutes.
  7. Add in salt and light soy sauce, stir and cover. Simmer for 30 minutes stir every 10 minutes.
  8. Add in hard boiled eggs and simmer for further 10 minutes.


Lotus Roots with Peanuts Soup

Lotus roots with peanuts soup is one of my all time favorite! If the price of fresh lotus roots in Melbourne is not cut throat expensive, I would boil this soup every other day. Recently, it is priced at $16/kg so it is kind of steep but I was craving for it so bought a small section to satisfy my cravings.

I have previously posted this recipe before but have since have revised it for better tasting. The use of mix of boiler chicken and pork bones to get the base stock in which will give a superior taste to the soup.


Ingredients

  • 2L             Chicken and pork bones stock (boiled in pressure cooker for 45 mins)
  • 200g         Lotus roots (sliced about 5-7mm thick)
  • 10             Red dates (de-seeded)
  • ½ slice      Salted preserved vege (tai-tao-choy) 
  • 150g         Raw peanuts (pre-boiled in another sauce pan and skin removed)
  • 2 slices     Dried cuttlefish
  • 1 pc          Honey date


Methods

Heat up the soup stock in a medium stock pot and put in all the ingredients and boil for 1 hour.

This soup is naturally sweet so there's no need to add any salt or seasoning.  


Wednesday, September 9, 2020

Deep Fried Chicken Skin

 I hardly do deep frying in the kitchen as it often smoke up the entire house and it actually stink if I can't  ventilate it especially during cold weather. If it is not too cold and windy, I'll try to do it at the alfresco area with my portable stove. Only problem is, the portable stove is quite hard to adjust and when I needed smaller fire. Life is always in dilemma! 

From my adventure with the chicken essence earlier, I've collected some of the chicken skin and decided to use them to make these hard to resist crunchy snacks... Its so sinful but so good!


Ingredients

  • 200g     Chicken skin
  • 6 tbsp   Plain flour
  • 3 tbsp    Rice flour
  • 1 tsp      Salt
  • Oil for deep frying
  • Water


Methods

  1. Clean and dry the chicken skin with paper towel. Cut to desired size.
  2. In a flat plate mix flours and salt and mix to combined. Prepare a bowl of water and heat up oil in a small pan or pot, covering at least half the pan or pot.
  3. Bring a piece of the skin and press into flour mix, shake away the excess.
  4. In a quick motion, dip the floured skin into water and toss it back into the flour mix and cover with flour, press gently to make sure skin is coated with flour. 
  5. Test oil with a chopstick and if you see bubbles rising mean the oil is hot enough and is ready.
  6. Toss in the coated skin and fry till golden for about 2 or 3 minutes turning after a min. When it starting to brown, lift it up for a few second and toss it back into the oil and fry a another min. Lift up and drain on a strainer.
  7. Serve warm.


Thursday, September 3, 2020

Double Boiled Chicken Essence

This prolonged covid-19 lockdown here in Melbourne is wearing many of us down. Besides the ever challenging remote learning for all the kids, parents are feeling so burnt out. Normally I get a few hours of sanity when the all the kids are in school but now with them home 24/7 there's no break at all. I need to prepare at least 2 meals a day and I am almost running out of ideas of what to cook! All these stress are building up and I felt so tired just thinking of what to cook the next day!

Things might not change for another few weeks so I totally need to nourish my body... and mind. They said chicken soup is good for the soul! Finally made this double boiled chicken essence to repair my body. It's not as complicated as it sounds but the result is very rewarding. It is so fragrant and so full of chicken flavors. 


What utensils you'll need to prepare this classic tonic: 

  • 1 small rice bowl
  • 1 big soup bowl
  • 1 plate big enough to cover the soup bowl
  • 1 claypot or stock pot to put in the soup bowl
  • 1 pestle


Ingredients

  • 1 Free range or farm run chicken between 1.2kg to 1.4kg


Methods

  1. Wash and clean up the chicken.
  2. Chop chicken into about 12 to 14 parts. Remove as much skin and fats as possible.
  3. Using the pestle, pound the chicken pieces to break up the flesh and bones.
  4. Invert the small rice bowl and place it inside the soup bowl.
  5. Arranged the pounded chicken pieces around the small rice bowl. Once done, cover with the plate.
  6. Place the big soup bowl with the chicken into the claypot or stockpot. Fill water till at least half of the big soup bowl and cover.
  7. Boil the water on high heat till boiling and switch to small/medium fire to boil for at least 3 hours.
  8. After 3 hours, switch off fire and remove the big bowl carefully.
  9. Remove the plate and using a thong, pick up all the chicken pieces.
  10. Carefully pick up the small rice bowl and the chicken essence with flow out.
  11. Strain into a bowl and serves hot. This will yield approximately 1 rice bowl of essence.