Pages

Showing posts with label Snack. Show all posts

Tuesday, January 12, 2021

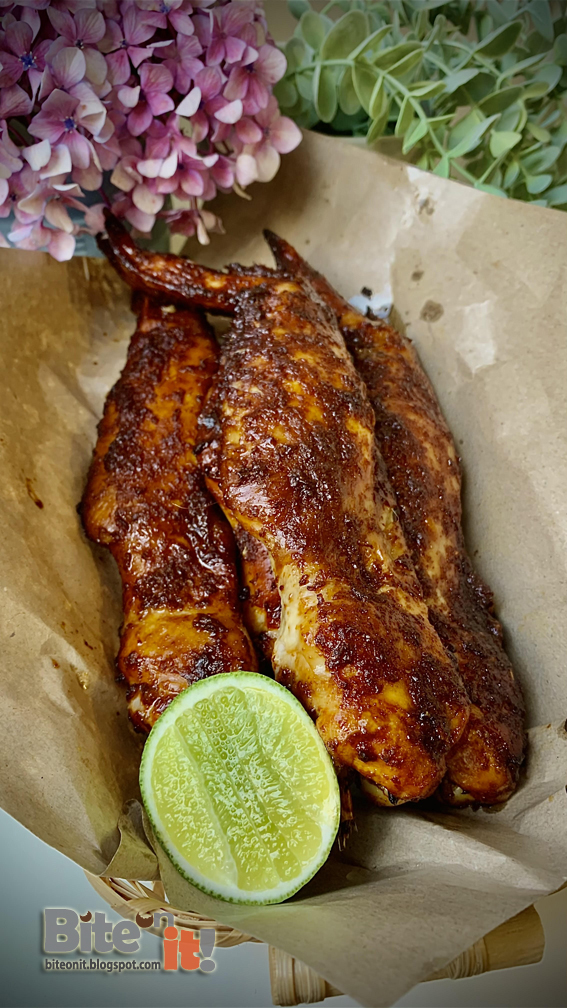
Air Fried Hawker Style BBQ Chicken Wings

Today marked the 9th year we made Melbourne our home. Can't believe how time flew by. As the saying goes, time flies when you are having fun! Can't agree more!

Bought some really good sized chicken wings to make hawker style BBQ wings the previous week for a new year get together. Kids loved them so much that they requested to have them again. Very lucky to get the same size wings again from the same shop over the weekend so got them prepped and ready to cook for dinner tonight.

These wings were marinated overnight and the flavors of the marinate permeated through the wings and they are extremely flavorful. You can grill them in the oven or even on the BBQ pit... charcoal heat will be even better especially with some charring! Squeeze some calamansi limes over them and you are good to go! If you like your wings spicy... dip with some sambal belacan!

This recipe is modified slightly from here.


Ingredients

2 kg        Chicken wings (12 to 15 pcs)

70g         Shallots

30g         Ginger

8 cloves  Garlic

3tbsp      Sesame seed oil

1tbsp      Cooking oil

2tbsp      Caramelized dark soy sauce

4tbsp      Light soy sauce

2tbsp      Fish sauce

2tbsp      Oyster sauce

2tbsp      Honey/Golden syrup

½tsp       Chili powder

½tsp       White pepper

1tsp        Salt

Satay sticks/Skewers


Methods

  1. Wash and pat dry chicken wings with paper towel.
  2. In a blender, blend together shallots, ginger, garlic, sesame seed oil and cooking oil into fine paste.
  3. In a mixing bowl, mix shallot paste with the rest of the ingredients and pour over chicken wings. Turn them around to coat them well. Cover and let them marinate overnight in the fridge.
  4. Push skewer through each wing so they are straighten before arranging them in the air fryer. Only 1 layer at a time as stacking will not achieve even browning.
  5. Air fry at 175°C for 5 minutes, brush with the remaining marinate sauce and continue to air fry for 5 mins. Brush with the marinate sauce again and air fry for another 2 mins (adjust cooking time accordingly depending on size of chicken wings).
  6. Serve warm with squeeze of calamansi limes or limes and sambal belacan.


* You can grill in the oven at 200°C for 20 mins or over charcoal BBQ pit.


Friday, November 6, 2020

Gula Melaka Banana Cake

When I was younger, I love eating banana cakes. Used to buy the whole loaf from the night market as in those days we hardly do any baking at home. My mom is not too keen to bake then. Also, it was more convenient to just buy as bake goods were not too expensive in those days.

I must say that over the years, the humble banana cake has evolved quite a bit as people are adding more ingredients into it and came out with all sorts of modified banana cakes or even breads which are more western types that has a more compact or denser texture.  

Here is a version where Gula Melaka was added to further enhance the aroma of this all time favorite.


Ingredients

  • 180g butter
  • 60g castor sugar
  • 50g brown sugar
  • 280g all purpose flour
  • 1 tsp baking powder
  • 1 tsp soda bicarbonate powder
  • 4 eggs (beaten)
  • 300g bananas (mashed)
  • 90g gula Melaka
  • 3 tsp water


Methods

  1. Preheat oven to 160°C.
  2. Sift all purpose flour, baking powder and soda bicarbonate powder, set aside.
  3. Beat butter, brown sugar and castor sugar with a mixer till light and fluffy.
  4. Add in beaten eggs in 4 additions.
  5. In a small sauce pan heat up water and shaved gula Melaka to melt.
  6. Mix mashed bananas and melted gula Melaka and pour into mixture.
  7. Fold in flour in 3 additions.
  8. Pour batter into greased or lined loaf pan. Sprinkle some shaved Gula Melaka and brown sugar on the surface before sending into oven.
  9. Bake for 70 mins on the second lower rack of the oven. Check for doneness with a cake tester before removing from oven.

Wednesday, October 21, 2020

Lemongrass Chicken Skewers with Special Dipping Sauce

I was working on a project to use chicken as the main protein which is easy to prepare and decided to use one of the recipes found in my book. As I seldom like to copy other bloggers' recipes, I will try to mix and match recipes from books, internet or from cooking shows that I've watch to come out with something. The initial protein used for this recipe was pork but using chicken is just as good.

The recipe from my book does not have any dipping sauce as it was meant for kids' bento. However, I felt that it will be good to add additional flavors to make the dish taste even better. My kids agreed that the dipping sauce did elevate the entire dish to a different level.


Ingredients

500g         Chicken thigh
2 stalks     Lemongrass
4 cloves    Garlic
2 tbsp       Fish sauce
½ tsp        Salt
1½ tbsp    Raw sugar
1 tsp         Cooking oil
1 tbsp       Dark soy sauce
a dash of black pepper
A couple of cilantro with roots (coriander)
Bamboo skewers/ satay sticks


Methods

  1. Cut chicken thigh into 1" cubes without skin.
  2. Pound lemongrass and garlic with a pestle and mortar into fine paste.
  3. Mix the chicken cubes with salt, sugar, fish sauce, dark soy sauce, cilantro (with roots), pepper, pounded paste and cooking oil. Marinate for at least 2 to 4 hours.
  4. String marinated chicken cubes with bamboo skewers.
  5. Heat grill pan with some oil and grill the chicken skewers till cooked.


Special Dipping Sauce

3 tbsp     Rice vinegar
3 tbsp     Lemon juice
1 tbsp     Fish sauce
3 cloves Garlic (minced)
1             Red chilli (chopped finely)
1             Bird eye chilli (optional for spicier taste)
½ tsp      Salt
1 stalk    Cilantro (chopped finely)


Methods

Mix all ingredients together.

Sunday, September 20, 2020

Kuih Bingka Ubi (Baked Cassava/Tapioca Cake)

I am not a huge fan of sweet food but I like cooking or baking them. When we first moved here, its not easy to find a lot of food that we used to eat back home. Over time it gets better but sometimes it can be costly and the taste may not suite our taste buds. Luckily with internet, I get to learn to cook a lot of food that we enjoyed from other people's sharing be it in Facebook or YouTube. 

Kuih bingka ubi is one of my hubby's favorite kuih. Previously it was hard find fresh ubi kayu/cassava, the main ingredient for bingka ubi here in Melbourne. Then a friend told me a couple of years ago that its ok to use frozen grated cassava. That means it so much more convenient! 

Over the past 2 years I have experimented with a few recipes but most uses desiccated coconut. Then stumbled onto this recipe shared by Shiokman Eddie. I like its texture as it is not as hard as those that have desiccated coconut in the mix. 


Ingredients


1kg       Grated cassava/tapioca or 2 packets of frozen cassava (500g each)
180g     Sugar
350g     Coconut milk
¼ tsp    Salt
2           Eggs
20g       Butter at room temperature


Methods

  1. In a bowl add sugar to the grated cassava/tapioca and mix them up till combined.
  2. Add in coconut milk, salt and the eggs.
  3. Mix all the ingredients thoroughly.
  4. Add in the soften butter at room temperature and mix well.
  5. Line a 10" square tin or a smaller tin (I used 7") if you want a taller kuih with baking paper, line the bottom with a piece of banana leaf and slowly pour in the mixture.
  6. Spread the mixture evenly with a spatula.
  7. Bake in a preheated oven at 160°C for 1 to 1½  to 2 hours.
  8. Do check after 1 hour into baking.Continue to bake till the surface is crispy golden brown and when skewer comes out clean.
  9. Remove kueh from baking tin and set aside to cool on a wire rack.
  10. Use a plastic knife or oiled knife to cut.


Friday, September 11, 2020

Tau Fu Fa using GDL

A couple of years ago some of us discovered about using GDL (Glucono delta-Lactone) to make tau fu fa or soy bean curd, a dessert loved by many. What make it so interesting is that we can actually use store bought unsweetened soy bean milk from the Asian grocers to make it. That was really exciting as the process of making your own soy milk is very tedious and time consuming. We were pleasantly surprised that the tau fu fa made with GDL turned out as smooth as those that used gypsum powder. For that, we can save so much by making our own instead of ordering from yum cha parlors 😄


Ingredients

  • 2L         Unsweetened soy bean milk (Yensons brand recommended)
  • 1tsp      GDL
  • 1tsp      Corn flour
  • 1tbsp    Water
Syrup
  • 4 slices  Ginger
  • 200ml    Water
  • Sugar or Brown sugar to taste


Methods

  1. Heat soy bean milk in a pot under medium fire till it reaches 95°C stirring all the time with a whisk to avoid the bottom from burning.
  2. In another stock pot or thermal pot, mix GDL and corn flour with water.
  3. Once the soy bean milk reaches 95°C, pour it over the GDL mix from a feet above the pot. This helps to mix the GDL with the soy bean milk well.
  4. Cover the pot and do not move it for at least 45 mins to an hour. 
  5. In a milk pot, boil water with ginger and sugar/ brown sugar to desired sweetness.
  6. Once the soy bean milk has been solidified, scoop with a flat spoon into bowl and drench with the ginger syrup. 


Wednesday, September 9, 2020

Deep Fried Chicken Skin

 I hardly do deep frying in the kitchen as it often smoke up the entire house and it actually stink if I can't  ventilate it especially during cold weather. If it is not too cold and windy, I'll try to do it at the alfresco area with my portable stove. Only problem is, the portable stove is quite hard to adjust and when I needed smaller fire. Life is always in dilemma! 

From my adventure with the chicken essence earlier, I've collected some of the chicken skin and decided to use them to make these hard to resist crunchy snacks... Its so sinful but so good!


Ingredients

  • 200g     Chicken skin
  • 6 tbsp   Plain flour
  • 3 tbsp    Rice flour
  • 1 tsp      Salt
  • Oil for deep frying
  • Water


Methods

  1. Clean and dry the chicken skin with paper towel. Cut to desired size.
  2. In a flat plate mix flours and salt and mix to combined. Prepare a bowl of water and heat up oil in a small pan or pot, covering at least half the pan or pot.
  3. Bring a piece of the skin and press into flour mix, shake away the excess.
  4. In a quick motion, dip the floured skin into water and toss it back into the flour mix and cover with flour, press gently to make sure skin is coated with flour. 
  5. Test oil with a chopstick and if you see bubbles rising mean the oil is hot enough and is ready.
  6. Toss in the coated skin and fry till golden for about 2 or 3 minutes turning after a min. When it starting to brown, lift it up for a few second and toss it back into the oil and fry a another min. Lift up and drain on a strainer.
  7. Serve warm.


Friday, June 19, 2020

Famous Amos Wannabe Chocolate Chips Walnut Cookies

The search is on to find the Famous Amos chocolate chips cookies recipe after I was given a gift box from Famous Amos by a visiting relative. I used to buy them when I was working in Singapore... a little treat after a busy week at work. These little morsels don't come cheap now. The last I checked on my last trip back to Malaysia, it was about RM7+ for 100gm for their regular chocolate chips cookies. 

During the lockdown, someone shared about a Malaysian housewife managed to decode the secret recipe that tasted closest to the real thing but after looking at the recipe which includes cooking oil I decided not to follow. A member in a food group posted this recipe which uses coffee emulsion/emulco/oil to elevate the aroma of the cookies caught my attention. Was thrilled I found a bottle of coffee emulco in my pantry which I have brought back from my last trip to Malaysia.

Without further hesitation I made a batch to taste. Followed the recipe to a T but somehow the texture of the cookies don't feel right. They lack the crunch factors. In fact they tasted rather doughy and hard. 

Comparing both recipes to see where are the missing links and found that this recipe does not include cornflour. So, made another batch by using this recipe as a base and tweaked the self rising flour and corn flour ratios. After 3 tries I finally achieved the texture I was after and believe me, once you started you really can't stop!


Ingredients

290gm   Self Raising Flour
70gm     Cornflour
250g      Butter - softened at room temperature
90gm     Dark Brown Sugar
90gm     Raw Sugar/Caster Sugar
½ tsp     Salt
½ tsp     Coffee Emulco/oil /emulsion
1            Large Egg
1 tsp      Vanilla Extract
25gm    Oats - toasted and grind to powder
25gm    Ground Almond Powder
250gm  Dark Chocolate Chips
100gm  Toasted Walnuts - crushed to smaller bits


Methods
  1. Beat the egg with coffee emulco and vanilla extract in a small bowl, cover with cling wrap and let it infuse for at least 2 hours or overnight in fridge. Bring to room temperature before to use (you can skip this step as I find it did not make any huge differences).
  2. Using a mixer, beat the softened butter, salt and sugar for about 5 minutes until well combined.
  3. Add in the egg mixture, ground oats and ground almond. Mix well.
  4. Sift in the flour and fold into the mixture using a spatula.
  5. Mix in chocolate chips and toasted walnuts and mix till you get a workable dough.
  6. Pre-heat oven to 160°C.
  7. Pinch about 10gm of dough and place on lined cookie tray with about 1” gap from the next cookie dough.
  8. Bake for approximately 20 minutes or till cookies turn slightly brownish.

Monday, May 11, 2015

Ang Koo Kuih with Mung Beans filling

Gosh! It has been the longest time since I last posted here! I did not stop cooking but life have been really busy with kids' school, kids' activities and also mother's duties! Cleaning is never ending!!!

Anyway, I have been experimenting with some Nyonya desserts the previous few months. One of them is the Nyonya Ang Koo kuih which is one of my favorite. I managed to eat some when I was back in Penang last September. Then when I got back to Melbourne, I thought I'll just try my hand making some.
Well, it has been a success so I am sharing with all!
.

.
I have made some and shared with friends here and all of them like it very much. For the recipe, I adapted it from The Star's Nyonya Flavours recipe book which you can get from major book stores in Malaysia.
.
Ingredients
A. Filling
  • 300gm Mung beans (washed and soaked over night)
  • 2 Pandan leaves (washed and knotted)
  • 280 gm Castor sugar (I cut down from 300gm and used raw sugar)
  • 4 tbsp Oil
B. Skin
  • 1/8 tsp Orange-red coloring (I used Wilton color paste)
  • 300ml Water
  • 400gm Glutinous rice flour
  • 150gm Sweet potato (peeled, steamed and mashed)
  • 4 tbsp Castor sugar
  • 2 tbsp Oil
  • Banana leaves cut to sized
  • Oil to glaze
  • Extra glutinous rice flour for dusting
.
Methods
  1. Steamed the mung beans with pandan leaves over boiling water for 30 minutes or until soft and mushy. Discard the pandan leaves and leave it to cool. Blend in the blender if you find the beans are not broken up and soft.
  2. Heat up wok with oil and add in the steamed beans and sugar. Stir till everything combined under low fire and not sticky to the hands.
  3. Cool and shaped the filling into small balls (depending on the size of your mould). I measured mine around 24 gm each ball to fit into my medium ang koo mould. Keep covered so they will not dry out.
  4. To make the skin, first add in the coloring into the water.
  5. In another bowl, place the glutinous rice flour, mashed sweet potato, sugar and oil then slowly bring them together to form a dough. Knead till everything is well combined. Divide into small balls (I weight mine to 26 gm each) and covered with damn cloth.
  6. To assemble, flour the ang koo mould with some glutinous rice flour, take one dough and flatten into about 3-5mm thick and wrap the filling. Closed all seams, rolled into a ball and dust lightly with some glutinous rice flour and press into ang koo mould.
  7. Press lightly with your palm to make sure the whole ball fit into the ang koo mould before knocking the mould lightly on the table to loosen the ball and dislodge from the mould.
  8. Place completed ang koo onto cut and lightly greased banana leaf.
  9. Steam ang koo in bamboo steamer over high heat for 6-7 minutes and open the lid every 5 mins to check. Lightly brush steamed ang koo with oil and leave it to cool.


Tuesday, January 7, 2014

Air-Fried Honey Miso with Rosemary Wings

Just realised that I have not shared any of my cooking using my Philip Air-fryer here! Just can't believe I've not posted anything cooked with the fryer as it has been one of my favourite kitchen gadgets the past few months!

And now that we are at it, this air-fried honey miso chicken wings is one of our favourite! I think I cook this every other weeks if not twice a week! :lol: My eldest girl just love eating these wings and at 4 she can clean all the meat off the bones all by herself! She thoroughly enjoyed them and I just have to ignore the mess she made while savouring them. >.<

.

.

These wings are so delicious that you can polish off a kilo without even knowing! They are so good as entree for meals or as snacks. And by using the air-fryer you don't have to worry about the excess oil. You don't even need to use a single drop of oil to cook and at the end of frying, you'll get at least a big spoonful of oil out of the wings! Can eat with less guilt! :D

.

Ingredients


  • 1kg Wings (mid joint)

  • 1.5 tbsp Red miso paste

  • 3-4 pips Garlic (coarsely minced)

  • 2 tbsp Honey (I mixed honey with heavy syrup)

  • 1 tbsp Soy sauce

  • 1 tbsp Dark soy sauce

  • A dash of pepper

  • 1 sprig Rosemary (break into a few sections)

  • 1tsp Mirin (optional)

.

Methods


  1. Clean the wings and pat dry with kitchen towels and place them in a mixing bowl.

  2. Mix all the other ingredients together in a medium bowl and marinade the wings for at least 4 hours. Best if leave overnight in the fridge. Bring to room temp before frying.

  3. Place wings into air-fryer baking pan (this is a separate accessory) till it filled half of the pan. Fry the balanced wings in the next round.

  4. Set temperature to 180°C and fry for 7 minutes. Turn the wings around and fry another 5-7 minutes or till brown.

  5. Alternatively you can place the wings on the net but do place a piece of baking paper underneath the wings so the skin will not stick onto the wire mesh during cooking time.

Friday, April 12, 2013

Nyonya Steamed Yam Cake (Or-Kuih)

A couple of weeks back, a friend gave me some home made steamed yam cakes and that actually sparked the interest of making some myself! I can't really say I am a fan of yam (taro) but anything savoury I'll go for it. I love the toppings! :)

Seeing that yam is not expensive, gave me a very good reason to test some recipes out. I checked online as well as some recipe books but the ingredients used differed very much from what I used to, so I called my mom up and ask for her recipe and it took me 3 attempts to perfect the flour mix as mom can't remember the actual amount of water she used.

The first two attempts, the batter was too hard as I did not have the wheaten flour so I used the potato starch which really harden the mixture and also, the recipe did not required the yam cubed to be steamed prior adding to the flour mix which gave me a very hard yam cubed. On the second attempt, I used wheaten flour but cut down on the liquid and again I got a very hard batter. I finally managed to get a perfect consistency on the third attempt and was  really happy with it!

.


These tasted so good with chili sauce and a bowl of black glutinous rice porridge! The hubby said the thought of having these brought him back to Penang! :)

.

Ingredients
  • 300 gm Yam (taro) - cut into small small dice

  • 300 gm Minced pork

  • 1 slice Preserved turnip (about 80-100 gm) - chopped finely

  • 130 gm Dried shrimps - chopped

  • 250 gm Rice flour

  • 1 tbsp Wheaten flour

  • 800 ml Warm water

  • 3 cloves Garlic - smashed and minced

  • 1 tsp Five spice powder

  • Salt and pepper to taste

  • Oil for frying

.

Garnishing
  • Sauted dried shrimps (half from the basic ingredient)

  • Sauted mince meat

  • Sauted preserved turnip

  • Toasted peanuts - lightly pounded/chopped

  • 1 stalk Spring onion - finely cut

  • 2 tbps Fried shallot

  • 1 Red chili - optional
.


Methods

  1. Steam the diced yam for about 30 minutes or until soft but still firm.

  2. Heat up wok/frying pan with some oil and fry the chopped dried shrimps till fragrant. Lift up and keep aside.

  3. Using the same frying pan, add a little oil and dry fry the chopped preserved turnip till fragrant. Lift up and keep aside.

  4. In the same frying pan, heat up some more oil and saute the minced garlic till light golden and add in the minced meat. Fry till cook.

  5. Lift up half the fried minced pork and keep aside.

  6. Stir the remaining minced pork in the frying pan, add in half the dried shrimps, half of the preserved turnip and the steamed diced yam with the five spice powder, salt and pepper until well mixed.

  7. Mean while, in a big mixing bowl, add in the rice flour and wheaten flour and stir in the warm water until you get a good and smooth batter.

  8. Add in the yam mix and stir till well mixed.

  9. Pour batter into a greased pan (I used a 8" springform pan lined with banana leaf) and steam for 40-50 minutes or until firm.

  10. Remove the pan from steamer (you might get a little wet top but not to worry) and let it cool on the table for 5 minutes.

  11. Sprinkle all the garnishing in this order - mince pork, dried shrimps, preserved turnip, spring onion, peanuts and fried shallot.

  12. Serve when it has cooled down to room temperature.


.

Monday, February 4, 2013

Pork Jerky / Bak Kwa / Long Yuk

Among all the Chinese New Year food that I like most is definitely the pork jerky or bak kwa (Hokkien) or long yuk (Cantonese). It is also a must have for the festive season especially when it comes to gift giving. For that, it command a high price when we purchase from the shops. The last time I bought, I paid RM26 for just 300 grams! Very expensive meat indeed!

I remembered that people actually queued for hours just to buy a few kilos in Singapore! It is insane but these bak kwa guys are reaping big money during CNY just like those mooncake guys during Mooncake festival! Well, I was never that crazy to queue for a few slices of fragrant meat :P Probably they are hard to make thus the high price?

.

.

Actually, I can get them in the Asian grocers here in Melbourne but I decided not to since it is just as expensive as back home. Thought I can live without a few slices of meat :) Then, one fine day, a friend shared a link on how to make these fragrant meat slices and it has been home made since! Yeah! At least I know now what are being mixed into the meat that made them so addictive!

Believe me, it is not difficult to make these at all and imagine the amount of $$ you can save! Best of all, you can add or reduce the ingredients to suit your taste. The recipe I shared here is from another friend which I modified to suit my taste. You are free to adjust it yourself. Try not to press it too thin else it will not be nice... lack the chewy effects. :)

.

Ingredients

  • 1kg Minced meat

  • 200 gm Sugar (sweeter taste nicer)

  • 2 tbsp Black soy sauce

  • 1 tbsp Light soy sauce

  • 4 tbsp Chinese rice wine (glutinous rice wine or rose wine)

  • 2 tbsp Fish sauce

  • 1 tbsp Oyster sauce

  • 4 tbsp Honey (more for glazing while baking/grilling)

  • ¼ tsp Five spice powder

  • ½ tsp Salt

  • Pinch of white pepper

  • Sprinkles of garlic powder

  • Red food coloring (optional)

Marinade over night

.

Methods

1. Spread a sheet of baking paper in the size of the baking tray/cookie sheet onto table and take a         chunk of the marinated meat and spread onto it, slowly pressing the meat around.


2. Using another piece of baking paper/clingy wrap to cover the meat, then use a rolling pin to slowly flatten the meat till about 2 to 2.5 mm in thickness. Keep adding more meat and flatten them with the rolling pin until you have filled most of the baking tray.


3. Try leaving a 1 cm gap from the sides of the tray as juices from the meat will ooze out during baking. You can also use the back of the knife to cut/mark some lines on the meat so you can easily fold or cut the meat later.

4. When you are done flattening the meat, remove the top baking paper/clingy wrap and transfer to greased baking tray (I greased with some oil) and remove the other baking paper as well.

5. Bake in preheated oven of 130ºC and bake for 15-20 minutes for both sides.

6. Take the meat out from the oven again, this time glaze them with some honey with a pastry brush as this will help to caramelise the surface to give it a nice charred effect and a beautiful shiny surface.

7. Then increase the temperature to 150ºC and bake/grill till brownish for about 10-15 minutes.

Notes:
You can add chilli flakes or chilli powder too if you like the spicy version.
If you are making beef, best to add some star anise powder to give it an extra kick.


Monday, January 7, 2013

Fruity, Nutty Chocolate Chips Cookies

Now that I am in the mood to bake cookies, I have made another batch of really yummy chocolate chips cookies which I have been wanting to do a long time ago but did not (trying not to snack on sugar!) until a friend baked me some over Christmas. From then on, I can't stop thinking of making these addictive cookies!!!

Trolled the net and discovered some recipes and decided to gave one of it a try. I modified the recipe to our taste buds as I cut down on the sugar a little.

.

.

While making these, I discovered I can achieve 2 different types of results by modifying the amount of flour used. I did one batch with less flour and it turn out soft and chewy!

.

Ingredients

  • 227 gm Butter (room temperature)

  • 1tsp Salt

  • 200 gm Brown sugar

  • 100 gm Castor sugar

  • 2 Eggs

  • 1tsp Vanilla extract

  • 500g Bread flour

  • 1tsp Baking soda

  • 2 cups mixed of Walnut+Raisin+Chocolate Chips

.

Methods

  1. Using the paddle of your stand mixer and beat the butter, salt and sugars till creamy.

  2. Add in egg, one at a time and mix till incorporated before adding the next one.

  3. Add in the vanilla extract.

  4. Switch to low speed and slowly add in the flour and baking soda.

  5. Break up the walnut into nibs and mix with the raisin and chocolate chips and add into the butter and flour mix. Mix well.

  6. Scoop a teaspoon (heap) onto lined baking tray with at least 2cm apart.

  7. Baked in pre-heated oven at 160°C for about 12-15 minutes in middle rack one tray at a time. Remove when sides of the cookie starting to turn brown but the top is still light in tone.

  8. Remove from oven and cool on tray for 5 minutes before transferring to wire rack. Store in a dry air-tight container.

Tuesday, November 20, 2012

Mango Sago Pudding

The best thing about living in a four seasons country is the food harvest from each season. This is our first spring/summer in Melbourne and currently mangoes are in season. At the vege market near our place, a tray of Kensington mangoes is selling at $15 for about 12 pieces (mid size ones) which is pretty reasonable. However, hubby is not too fond of Aussie's mangoes so we did not buy a tray but a few fruits each time I shop. He will buy the Thai's King mango instead. :P

I got this free magazine from one of the local supermarket and spotted the recipe for mango sago pudding and thought I should give it a go since I have some ripe Kensington and some coconut milk balanced from my laksa a few days ago.

The recipe called for the syrup from the canned mango so I decided to modify the ingredients' portion as I know it will be very sweet if I follow the recipe to the dot. After mixing the mango puree, the color was not too 'bright' yellow so I decided to 'pump' it up by adding a small squirt of yellow food coloring which turned out gorgeously. :)

.

.

Ingredients

  • 1 can Mango in syrup (I used the 425g can) - pureed

  • 100 gm Sago

  • 200 ml Water

  • 50 gm Caster sugar

  • 130 Coconut cream/milk

  • 1 fresh Mango (half for puree and half for garnish)

  • Yellow food coloring (optional)
.

Methods

  1. Drain mango slices and reserve the syrup. Puree the mango slices and set aside.

  2. Rinse sago in running water and drain.

  3. Combine the mango syrup, sago, water and sugar in a medium saucepan and bring to boil over medium heat stirring frequently.

  4. Reduce the heat and simmer + stirring until all the sago turned translucent and the mixture is thick and sticky. This will take at least 20 minutes or so.

  5. Add in the coconut milk, stir and simmer for another 5-6 minutes and remove from heat.

  6. Mix in the pureed mango and stir till well combined. Add yellow coloring if you're not happy with the natural color (looks a bit greyish)

  7. Spoon into ramekins, covered and chilled. Serve with cubed fresh mango.

Monday, September 24, 2012

Fruits & Nuts Cinnamon Rolls

Now that my bun making engine is in the momentum, I decided to try as many bakes as possible before I drop down! There are just too many buns and breads I wanted to make but time is always a factor since it requires a lot of time since there are so many steps involved. The proofing of doughs have been the toughest as I have to manage my time so that my baby is napping when the dough is ready to be shaped.

Anyhow, I decided to bake some cinnamon rolls in between if I can find the time as it is simpler compared to making those assorted buns. However, cinnamon rolls are more sinful since there are more butter and sugar used but I can tell you, the aroma while it is baking in the oven will make it all worth while... not to mention when you bite on it! And they are great when accompany with some nice fruit tea! :)

.

.
I've tried 2 recipes for the cinnamon rolls and found out that the Pai Bao or Hong Kong Sweet Bun recipe is more fragrant compared to the one with less ingredients though still using Tang Zhong. The texture is more or less the same so if you are out of some of the ingredients for Pai Bao, you want actually use this recipe. :)

.

.
I love how soft and fluffy these rolls are!

The weather here is cold so it get harden faster as compared to when you are in the tropics. Therefore, each time I want to eat one of the rolls I will heat up for about 15-20 seconds in the microwave and it comes out light and fluffy again!

.

.

This recipe is adapted from here but instead using a bread maker, I used my mixer for the kneading.

.

Ingredients (yields 9 rolls in a 7"x7" baking pan)

  • 210 gm Bread flour

  • 50 gm Cake flour

  • 5 gm Yeast

  • 50 gm Sugar

  • ½ tsp Salt

  • 1 Egg + water = 110 gm

  • 75 gm Tang Zhong

  • 30 gm Butter (cut into small cubes)


Filling

  • 30 gm Butter, cut into small chunks and soften

  • 30 gm Brown sugar + 1 tbsp ground cinnamon powder

  • 100 gm Mixed dried fruits or raisins + Nuts (I used raisins, dried apricots and walnuts)

Some beaten egg and melted butter for glazing.

.

Method:

  1. Put all the wet ingredients except butter into the mixer, stir them a bit then add in the flour, sugar and yeast. Then fit the mixer with the hook attachment and put on speed 2 to start kneading. When everything comes together, put in the salt and continue kneading for a minute or two before putting in the butter.

  2. Once the kneading is finished, approximately 30 minutes, remove and place dough on a floured surface.

  3. Punch down and shape it round. Rest dough for 15 minutes covered with a cling wrap or cloth (I proofed in the oven for 30 mins as it was a cold day here).

  4. Roll dough into a flat sheet of 28cm x 40cm with a rolling pin.

  5. Spread the cinnamon sugar evenly and top it with butter cubes and the dried fruits and nuts.

  6. Roll it up swiss-roll style and cut into 9 pieces of about 3cm thick.

  7. Put them in a 7"x7" (20cm x 20cm) baking pan and proof for 45 minutes or till double in size in a warm place, covered with a damp towel.

  8. Glaze with egg wash and bake at 180C for 20 minutes.

  9. Remove from oven and quickly glaze with melted butter for added fragrance and presentation.

Friday, August 17, 2012

Strawberries & Cream Swissroll

Besides chiffon and sponge cake, I am also a fan of Swissrolls. Well, probably it is also another type of sponge cake! :P I just like cakes that are not too heavy but spongy and light. I don't really fancy buttercream but happy with some fresh cream. Used to buy a lot of Swissrolls each time we visit Ipoh. I guessed everyone who has visited Ipoh, knew about or tasted JJ Swissrolls. I was a HUGE fan! hehehe Each time we pass by Ipoh, we never fail to pack a few rolls home!

All these while I have the perception that Swissroll is a challenge to make... especially the rolling part. It kinda scares me off thus I have never have the courage to try making any... until yesterday!

However, after joining the Munch Ministry FB Group and reading on so many amateur bakers trying their hands on baking a varieties of bakes, I decided to gather my courage to try baking something I really like but does not have the guts before. I am so happy I overcame this fear and bake my very first Swissroll!


Also, it is the strawberry season again (I think there is 2 seasons here in a year!) that I bought so many punnets of strawberries the last few weeks! My kids are more than happy to eat them fresh but a few days ago, my boy asked for cream on cakes. That sparked the idea of making this strawberries and cream Swissroll.

.

Ingredients

(A)
  • 5 Egg yolks

  • 80g Caster sugar (I think can go even lower)

  • 1 tsp Vanilla extract

  • 2 tsp Melted butter

  • 60g Heavy cream (Whipping cream)

  • 1 tsp Lemon zest (I put almost 1tbsp as I have so many lemons!)

  • 1 tsp Fresh lemon juice

  • 55g Cake flour

(B)
  • 5 Egg whites

  • ½tsp + 2 pinches of Cream of tartar

  • 95g Caster sugar

  • Pinch of salt


Cream filling
  • ½ Cup of Whipping cream (I used 1 cup as my kids love extra cream)

  • 4 tbsp Icing sugar

  • 1tsp Vanilla extract

  • Hulled strawberries and cut into small chunks or quartered


Methods
  1. First, line a 10 inch x 15 inch baking try by spraying some oil onto the pan so the parchment paper will stick onto the pan. Leave aside.

  2. Start with (A). Cream the egg yolks with the caster sugar with a whisk until pale and creamy. You can use a mixer too which can be done faster!

  3. Add in the vanilla extract, mix well then followed by the melted butter, heavy cream, lemon zest and the lemon juice while continue whisking.

  4. Sift in the cake flour and gently fold in using a rubber spatula. Set aside.

  5. Move on to (B). In a mixer mixing bowl, beat egg whites till foamy then sprinkle in the cream of tartar. Then slowly pour in the caster sugar in mid speed. Once all the sugar has been mixed in, switch your mixer to high speed and beat till stiff peak.

  6. Take about ¼ of (B) and fold into (A) in one direction gently and not compressing the air in the egg white. Continue with the rest of the egg white. Your batter should be runny now and in pale creamy yellow.

  7. Pour into baking try and bake in 170ºC preheated oven for about 20 minutes then increase to 180ºC degree for another 3 minutes.

  8. Leave it in the oven with door ajar (this is to avoid the sudden drop of temperature) for a few minutes before cooling on rack.

  9. Prepare the cream for filling by whipping it with icing sugar and vanilla extract till stiff peak using a mixer. Chill it in the fridge.

  10. When cake is completely cooled, spread the chilled cream onto the entire cake surface but keep the end thinner so your cream will not get squashed out after you rolled your cake.

  11. Place all the cut strawberry chunks onto the cake and slowly roll peeling the parchment paper along as you roll. There maybe some batter that will stick onto the paper but don't worry, just continue rolling.

  12. Once you are done, throw away the parchment paper and wrap your cake with a fresh piece of parchment paper to keep the shape. Chill in the fridge for at least 10 minutes before cutting. I blast chill in the freezer :P

  13. Cut both ends away for a better presentation.

Friday, August 10, 2012

Creamy Caramel Popcorns with HCP

Like many Asian moms, I am on the HCP bandwagon too! I purchased my HCP or commonly known as Happy Call Pan which is from Korea months before but only got to use it after my confinement was over. My mom brought it over from Malaysia when she came over to help me with my confinement.

So, for the last 3 months I have been using this very versatile pan to do most of my cooking. This pan is really good as I can use minimal oil to do stir frying. In fact it can fry fish without using any oil so there will be no oil splattering on the stove top! However, I don't fry fish all the time since the hubby prefer steamed fish.

Two weeks ago, while shopping at Target, they were promoting this handy popcorn maker and gave out free popcorns. My girl has 2 servings and began to bug me for more. Feeling a little embarrassed, I told her that I'll make them for her since I knew my HCP can do the job. Also, I am missing those sweet and crunchy popcorns we used to buy from the cinema so I was so eager to try making them! :D

.

.

I went to get some corn grains from the supermarket and tested them out. The first try was not so successful as the corn grains did not popped properly. There were many un-popped grains. Thus, I went to search for the popping corn grains and was lucky I found a grocer nearby my place that has it. It was selling much cheaper too! Was so happy to get fluffy looking popcorns. :)

Next was having the perfect caramel to coat these fluffy pops. Tested out 2 different recipes for the caramel sauce with the first one too oily and decided to try the second which has cream. I tweaked the recipe and finally got a good combo.

.

Ingredients
  • ½ cup Corn grains

  • 2tbsp Oil

  • 50g Butter

  • ¾ cup Raw sugar

  • 2tbsp Honey

  • 2tbsp Thick cream

  • A pinch of salt


Methods
  1. Line a baking tray or a big mixing bowl with parchment paper.

  2. Heat up both sides of the HCP using medium flame for a minute.

  3. Heat up the oil for a minute and toss in a corn grain to test. If the oil is hot enough the grain will 'dance' in the hot oil before it pops.

  4. Toss in the rest of the corn grains, stir them a little and make sure all are coated with oil before you close and lock the pan.

  5. When they are ready, you'll hear popping sound. Shake the pan a bit and turn to small flame. Move the pan around so that every area get heated. Off the flame when the popping sound stopped.

  6. Move all the popcorns to the prepared tray or bowl.

  7. Clean the HCP off all the residue from the popcorns with a kitchen towel.

  8. Heat the pan again and melt the butter. Add in the sugar and stir continuously till all are well mixed. Sprinkle in the salt.

  9. When the butter and sugar mixture starts to boil and you can see it bubbles, stir and switch to small flame and continue stirring for another 3 or 5 minutes.

  10. When it starts to brown, add in the honey and thick cream and stir till well mixed and let it continue to caramelize.

  11. Once the caramel turn darker brown, switch off the fire and very quickly pour it over the popped corns. You have to do this very quickly as the caramel solidify very fast. Give the the popcorns and caramel a quick stir so all the popcorns will be coated.

  12. Store in air tight containers if you want to consume later.

Monday, July 23, 2012

Stir Fry Bowties Pasta

My kids prefer to eat noodles and pasta over rice but my hubby is a rice barrel! Can't satisfy everyone's preference so I told them to compromise that only on weekends we get to have noodles. So far the arrangement is working fine.  :)

So, to keep my promise, the kids get to have their noodles or pasta on weekends. Sometimes I will do the regular Hakka or Cantonese fry but pasta is cheap here so beside using them in pasta type of dishes, I will either use them for noodles soup or stir fry them.

Also, I've been using my HCP (Happy Call Pan) to do most of the frying which is very convenient and less oil splattering onto my stove top.


.

Ingredients

  • 150g Bowties pasta

  • ¼ of Red Capsicum - strips

  • ¼ cup of Green pea

  • 100g of Meat (chicken or pork cut into thin strips)

  • 1 small stick of Carrot - sliced

  • ½tsp Garlic -minced

  • Soy sauce

  • Black sauce

  • Pepper

  • Mirin (Japanese sweet cooking wine)

  • Raw sugar

  • Salt

  • Olive oil

.

Methods

  1. Marinade the meat with some soy sauce, black sauce, pepper and mirin and set aside.

  2. In a small pot, boil half a pot of water added with some salt and cook the pasta till al-dante (at a chewy stage), drain away the water and sprinkle some olive oil to keep them apart.

  3. In a frying pan (in this case in the HCP) saute the minced garlic with a tsp of oil till fragrant.

  4. Toss in the marinated meat and stir fry till brownish and 80% cooked.

  5. Add in the capsicum, then the peas and carrot and continue to fry for 2 minutes or so. If using HCP, you can click and lock it.

  6. Toss in the cooked pasta and stir to mix them well (if using HCP, you can lock and flip the pan)

  7. In a small bowl, mix some soy sauce, dark soy sauce, raw sugar, pepper and about ¼ cup of water and pour over the pasta and vege mix. Stir till well mix.

  8. Serve while hot!

Tuesday, June 26, 2012

Strawberry & Banana Muffins

I thought only during spring and summer the strawberries are on sale but was surprised to find 'winter strawberries' in Aldi last weekend so bought a few boxes! And guess what? They were sweet! :D

There were some ripe bananas on the counter and I thought why not bake some muffins? And how about adding some strawberries since I have so many??? They were yummy!!! The sweetness from the banana is neutralized by the mild acidity from the strawberries which make them perfect!

I just love them when they are warm!

.

.

Ingredients
  • 2½ cup Self raising flour

  • ¾ cup Raw sugar (you can use brown sugar)

  • 1 cup Milk

  • 1 Egg

  • 2tbsp Sunflower oil (you can use margerine)

  • 1tsp Vanilla essense

  • 2 ripe Banana (mashed)

  • ½ cup Strawberries (cubed and some sliced for deco)


Methods
  1. In a big mixing bowl, place flour, sugar, mashed banana, vanilla essence, milk and margerine together.

  2. Beat egg in a small bowl and pour into the big mixing bowl with the rest of the ingredients and mix them well and incorporated.

  3. Add in the cubed strawberries and mix them into the batter.

  4. Fill into prepared muffin liners in regular muffin pan about ½ full.

  5. Place some sliced strawberry on each cavity before baking in oven at 180ºC.

  6. Yields about 16 muffins.

Friday, June 15, 2012

Mini Herbed Muffins

One night while watching Masterchef, Darrius told me that he wanted to be one of the 3 men who do the tasting! How ambitious is that???!!! :lol: Well, I told him that, before he can be a taster, he must first learn to cook well and be a very good chef. Looks like cooking is in the genes :)

Darrius gets to cook in his school's kitchen (that was one of the reasons why we chose this school) twice a semester. Last week, he got to bake these little herbed muffins and brought some home which tasted pretty nice and he asked if we can make them at home. Therefore, I went to get some cheese and decided to bake a batch to try but I twisted the recipe a little as I did not have all the ingredients but they turned out great :)

.

.

Ingredients
  • 1 cup Self raising flour

  • 1 cup Grated cheese

  • 1 tablespoon Mixed herbs

  • 1 tablespoon Fresh parsley

  • ½ teaspoon Salt

  • 1 teaspoon Sugar

  • 1 Egg

  • ½ cup + 2 tablespoons Milk


Method
  1. Place the flour, cheese, parsley, herbs, salt and sugar in a big mixing bowl and mix them well.

  2. Use another bowl to mix egg and milk and whisk till fluffy.

  3. Slowly pour in the egg and milk mixture into the dry ingredients and fold them together until they are well dampen but not whisk them further.

  4. Spoon mixture into mini muffin tins lightly glazed with some oil or butter.

  5. Bake at 200°C for 10-12 minutes or until cooked (use a pick to poke and it comes out clean).

Sunday, August 8, 2010

Baked Pasta on Bread

It has been a long time since I make any baked snacks at home. We have just too many packets of cookies and other snacks lying around the house waiting to be finished up. Darrius spent half the day in school so he skipped one snack time at home. When he returned, his lunch will filled him up till dinner time and that means, no more snacking time in those 5 days of the week!

I actually made these simple snack some time back when I was trying to find ways to make something interesting to munch...

.

.

Ingredients

  • 100g Pasta (I used some characters pasta)

  • 6 slices of Bread (cut into star shape)

  • Pasta sauce (I used the Leggo's Pasta Bake sauce)

  • Cheese bits

  • Ham bits

.

Methods

  1. In a medium sauce pan, boil the pasta with some salt. Drained and leave to cool down.

  2. Cut the bread slices into star shapes using a cookie cutter and placed them into muffin tins with the 5 edges  sticking out.

  3. In the centre of the bread, put a dullop of pasta sauce and some cooked pasta on it before dropping another dullop onto the pasta.

  4. Before sending the tray into the oven, sprinkle with some cheese and ham bits on the top. Bake at 200°C for about 20 minutes or till the edges of the bread turned brownish.