Pages

Tuesday, July 17, 2012

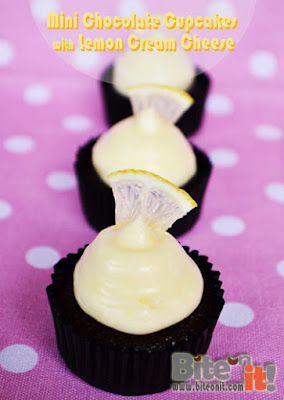
Mini Chocolate Cupcake with Lemon Cream Cheese

Some friends asked me why I have been posting dessert only posts lately? Well, very simple... I've taken my Kitchen Aid out and my hands are itchy to try out all those recipes which I have been collecting over the years. I must say, it was fun and therapeutic especially when the kids are making havoc in the house! :P

Last weekend, we were invited to our friends' son's birthday so we can't be going there empty handed. Decided to bake something as contribution (which is a norm in Australia when there is a makan-makan session!) to the little party. I knew there will be a lot of food so making bite size food will be ideal. Also, I wanted to use up some of the lemons which were given by another friend.

.


This is the first time I've used cream cheese for frosting my cakes (the cold weather here is perfect!) as the acidity from the lemon juice and lemon zest made the chocolate cakes taste superb! It was a winning combo!!

.
.

Ingredients (Mini Chocolate Cupcake)

  • 113g Butter - room temp

  • 120g Castor Sugar

  • 3 Eggs - room temp (I used medium sized eggs)

  • 103g All purpose flour

  • ½ teaspoon baking powder

  • ¼ teaspoon baking soda

  • Pinch of salt

  • 43g Unsweetened cocoa powder

  • 120ml Milk

  • 1 tsp Vanilla essence

(This recipes yields about 2 dozens mini cupcakes)

.

Methods

  1. Beat butter until softened. Add sugar and beat on high until light and fluffy.

  2. Add in eggs, one at a time, beating until well combined.

  3. In a small mixing bowl, sieve flour, baking powder, baking soda, salt, and cocoa powder, mix to combine.

  4. In another bowl, mix the milk and vanilla and stir to combine

  5. Add about a third of the dry ingredients to the butter batter and beat to combine. Add about a half of the milk/vanilla and beat to combine. Continue adding, alternating between dry and wet and finishing with the dry.

  6. Scoop batter into cupcake cups about 2/3’s full (the cakes will not rise a lot as this recipe is not a dome cake recipe... it is flat top which is ideal for frosting)

  7. Bake cupcakes in preheated oven and bake at 170°C for 15-18 minutes or until cake tester comes out clean.

Frosting

  • 1 block (250g) of Philadelphia Cream Cheese

  • 1 Cup Icing/Confectioner sugar

  • 1tbsp Lemon juice (freshly squeeze)

  • 1tsp Lemon zest


  1. Mix cream cheese and sugar in the mixer bowl, beat till well combine, add in lemon juice and lemon zest and beat till light and fluffy.

  2. Fill cream cheese into piping bag and pipe out onto cooled cupcakes.

.

.

Cupcake recipe is adapted from here

Wednesday, July 11, 2012

Strawberries on Cream Sponge Cake

You will not believe if I tell you that I've never attempted making any sponge cake! Unbelievable yeah? For someone who used to have a cupcake blogshop, this is indeed rare! Most people would have thought that I can whip up any types of cakes but in actual fact, there are so many varieties which I have yet to attempt.

Since we are putting on a lot of weight in this cold weather, I tried not to consume too much fatty food. They kids have been putting on lots of weight too so I have to go for alternatives to cut down on our oil & sugar consumption. For healthier choice, instead of cooking with butter, I'll go with sunflower or canola oil. I'll try to use brown sugar for cooking and baking whenever possible.

While the kids have been pestering me to bake more cakes for them, I opted to make sponge cake which uses vegetable oil oppose to butter cake. For that, my sponge cake journey begins...

I throng the net looking for some easy to make sponge cake recipes and was glad to compile a few recipes and modified them accordingly so I'll have my very own sponge cake recipe that works for me. The initial recipe was adapted from here.

With the cheap winter strawberries in season... I took the opportunity to make this really light and airy sponge with with cream topped with sliced strawberries which was a hit with the family! :D

.

.

Ingredients

(A)
  • 1 Eggs (whole)

  • 4 Egg yolks

  • 50ml Sunflower oil (or any non fragrant oil)

  • ½tsp Vanilla essence

(B)
  • 50g Cake flour (low gluten flour)

(C)
  • 4 Egg white

(D)
  • 50g Castor sugar

  • ¼tsp Salt


Method
  1. Beat (A) with a whisk till well mixed in a big mixing bowl.

  2. Slowly sieve in (B) into (A) till well combine.

  3. Using the whisk attachment on your mixer beat (C) till frothy and add in (D) and beat till stiff peak.

  4. Fold in the egg white & sugar mixture into the egg yolk mixture in a few additions but not over beating but making sure they are well combine. It is okie if you can still see patches of egg white foam in the batter.

  5. Pour into two baking tins (I used a 6" round tin) lined with parchment paper.

  6. Bake at 170 (or depending on your oven's heat) for about 20-25 minutes or till cake tester comes out clean. It should rise 2x the height of the batter.

  7. Leave the baked sponge in the oven with its door ajar for a few minutes before taking it from the tin and leave it cool upside down on a cooling rack.


Cream & Decorations
  • 1 punnet Fresh strawberries hulled and sliced thinly

  • ¼ punnet strawberries cut into small chunks

  • 1 cup Whipping cream

  • 3 tbsp Castor sugar

  1. Whip the cream with sugar in high till it foams stiff peak.

  2. Spread some of the whipped cream on top of one sponge, sprinkle with the strawberry chunks and another another layer of whipped cream.

  3. Stack the 2nd sponge, spread a layer of whipped cream on top and decorate with sliced strawberries...

Tuesday, June 26, 2012

Strawberry & Banana Muffins

I thought only during spring and summer the strawberries are on sale but was surprised to find 'winter strawberries' in Aldi last weekend so bought a few boxes! And guess what? They were sweet! :D

There were some ripe bananas on the counter and I thought why not bake some muffins? And how about adding some strawberries since I have so many??? They were yummy!!! The sweetness from the banana is neutralized by the mild acidity from the strawberries which make them perfect!

I just love them when they are warm!

.

.

Ingredients
  • 2½ cup Self raising flour

  • ¾ cup Raw sugar (you can use brown sugar)

  • 1 cup Milk

  • 1 Egg

  • 2tbsp Sunflower oil (you can use margerine)

  • 1tsp Vanilla essense

  • 2 ripe Banana (mashed)

  • ½ cup Strawberries (cubed and some sliced for deco)


Methods
  1. In a big mixing bowl, place flour, sugar, mashed banana, vanilla essence, milk and margerine together.

  2. Beat egg in a small bowl and pour into the big mixing bowl with the rest of the ingredients and mix them well and incorporated.

  3. Add in the cubed strawberries and mix them into the batter.

  4. Fill into prepared muffin liners in regular muffin pan about ½ full.

  5. Place some sliced strawberry on each cavity before baking in oven at 180ÂșC.

  6. Yields about 16 muffins.

Friday, June 15, 2012

Mini Herbed Muffins

One night while watching Masterchef, Darrius told me that he wanted to be one of the 3 men who do the tasting! How ambitious is that???!!! :lol: Well, I told him that, before he can be a taster, he must first learn to cook well and be a very good chef. Looks like cooking is in the genes :)

Darrius gets to cook in his school's kitchen (that was one of the reasons why we chose this school) twice a semester. Last week, he got to bake these little herbed muffins and brought some home which tasted pretty nice and he asked if we can make them at home. Therefore, I went to get some cheese and decided to bake a batch to try but I twisted the recipe a little as I did not have all the ingredients but they turned out great :)

.

.

Ingredients
  • 1 cup Self raising flour

  • 1 cup Grated cheese

  • 1 tablespoon Mixed herbs

  • 1 tablespoon Fresh parsley

  • ½ teaspoon Salt

  • 1 teaspoon Sugar

  • 1 Egg

  • ½ cup + 2 tablespoons Milk


Method
  1. Place the flour, cheese, parsley, herbs, salt and sugar in a big mixing bowl and mix them well.

  2. Use another bowl to mix egg and milk and whisk till fluffy.

  3. Slowly pour in the egg and milk mixture into the dry ingredients and fold them together until they are well dampen but not whisk them further.

  4. Spoon mixture into mini muffin tins lightly glazed with some oil or butter.

  5. Bake at 200°C for 10-12 minutes or until cooked (use a pick to poke and it comes out clean).

Thursday, June 14, 2012

SPAM Fried Rice

We seldom eat can food when we are in Malaysia since we can get fresh food at a relatively low prices outside. So, when I am not cooking (too lazy) we'll just walk over to the nearby hawker stall and pack food. However, it is entirely different when we moved to Melbourne. Eating out or buying outside food can be a costly affair. Therefore, we avoid eating out or buying outside food as much as possible. We'll, we can't be eating fast food all the time rite? And the Asian food here sucks... they are all the same... taste and choice wise!

That was why we have started stocking up on can food for convenience sake. The weather can be really cold sometimes and we need to have hot food during these time. The kids and the hubby don't really fancy having sandwiches all the time so I have to think of ways to make food interesting! That is tough job!

Anyway, we have a knack for luncheon meat and when Coles was having ½ price sale for their SPAM, I just can't resist stocking up... after all, can food can be stored for quite a while. Even my mom bought a few cans home when she was here last month cause they are so expensive back in Malaysia! 1 can of SPAM is selling @ RM17.50 in Cold Storage! Insanity!

.


Ingredients
  • 1 can SPAM (I used the one with Bacon variety) - cubed

  • 1 cup Fench beans - diced

  • 1 cup Carrot - diced

  • 1 cup Corn Kernels - drain away the water

  • 3 cup Cooked rice - cooled

  • 2 Eggs

  • 1 tbsp Sauteed minced/chopped garlic

  • Oil for frying


Method
  1. Heat up frying pan with some oil (I used non stick pan so uses less oil) and lightly stir fry the French beans and carrot for about 5 minute on medium fire. Lift up and put aside.

  2. Using the same pan, add in a tbsp of oil and stir fry the the cubed SPAM till they turn brownish, lift up and put aside.

  3. Beat the eggs in a bowl and fry it in the same pan with another tbsp of oil.

  4. Add in the rice into the egg mixture and stir vigorously until they are well mixed.

  5. Toss in the French beans, carrot, corn kernel and SPAM and mix them well.

  6. Add the sauteed garlic and stir for another minute or so until you can hear the 'pop' sound from the hot rice.

Wednesday, March 21, 2012

Flaky Portuguese Egg Tarts

I am not a dessert person nor do I have sweet tooth though I love to bake and decorate cakes! I just love looking at pretty cakes and dessert especially petite four. However, once in a while I do crave for some sweet delights. Like today.

Have been wanting to eat egg tarts for so long so I went around the net and try looking for the simplest recipe to start off with. Also, I need to check the ingredients I have on hand and looking through Su's site, I got one which is extreme simple with minimal ingredients involved! Yippee! :D

I just love how flaky these tarts were and they are not the least sweet! The only down side was... the recipe only yields 6 tarts...

.

.

Ingredients
  • ¼ cup Full cream milk

  • ¼ cup Whipping cream

  • 4 tbsp Castor sugar

  • 3 Egg yolks beaten

  • 300g Puff pastry


Methods
  1. Pre-heat oven to 200C (depending on your oven)

  2. Pour full cream milk and whipping cream into a glass bowl and put into microwave oven for 2 minutes.

  3. Once boil, remove from microwave and add in the sugar, mix till dissolved. Heat in the microwave for another 45 seconds.

  4. Take out and add in the beaten egg yolks in a thin stream with a balloon whisk.

  5. Cut out the puff pastry using the biggest circle (which can line your cupcake tray mould). Line the mould with at least 2 layers of the biggest circle and another one smaller circle (1cm smaller) and lightly press the pastry to fill up the mould.

  6. Slowly pour in the mixture into all the shells and pop into oven for 30mins or until you see the centre pop up with brownish sides...

Monday, March 19, 2012

Japanese Steamed Cake (Mushipan)

Oh dear! It has been ages since I posted here!! Not that I have stopped cooking, just that I really don't have much time to edit the photos and making the effort to post. However, I have tried posting more on my bento creations as that has been an integral part of my daily must do since my boy goes to formal school now.

Also, we are adjusting to our new life here in Melbourne (we've just migrated here 2 months ago) so there are so much to do since a couples of months back. Not to mention I was down with severe morning sickness (yeah, it is my 3rd one!) since last August... which explained my disappearance.

Ever since moving here, I have been cooking quite a fair bit as eating out is expensive here but I kept to the favorite few recipes which are fool proof with the family.

With the kids getting older, they knew how to make requests and sometimes I just feel I need to do my bit as a mommy and give them the treats they deserved. Lately, they have been asking for cakes (and cakes sold at the supermarts are so darn sweet!) so I tried looking for simple recipes which is fast, yummy and healthy. Electricity is expensive here so I try to avoid baking with oven so steaming is the best option!

Previously, I tried making the Steamed Banana Cupcakes but that recipes is not totally fool proof (it can be quite hard sometimes) so I tried to search for another and was glad I found one which is healthy and with minimal ingredients too! You can find the original recipe here as I've twisted the ingredients a little to suit our taste buds (you can get creative and come up with various ingredients that you like!). It is actually a type of Japanese tea-cake which is called mushipan. I just love the light and fluffy texture when it is fresh out of the steamer!

.


.

Ingredients (Yields 8-9 medium sized cupcakes)

  • 200g Plain flour

  • 2tsp Baking powder (I used double action)

  • 2 Eggs (60g each)

  • 50g Castor sugar (I used brown sugar)

  • 100ml Water

  • 2tbsp Vegetable oil

  • 2 Bananas (Diced and kept some for topping)

.

Methods

  1. Sieve flour and baking powder in a big bowl. Set aside.

  2. Beat eggs and sugar till fluffy and add in the vegetable oil and beat till well mixed.

  3. Mix the water and egg mixture alternately into flour until you get a thick batter.

  4. Heat up steamer/wok with water.

  5. Lined moulds with cupcake cups while you add in the diced banana into the batter before filling the cupcake cups to 2/3 full. Sprinkle some diced banana on top before sending them into the steamer.

  6. Depending on size of your cupcake mould... it should takes about 10-12 minutes to cook...